My previous post on deploying a sample application to Tomcat proved so popular that I've added this set of screencasts that describe how to do a similar deployment to JBoss. (Note that the screencasts assume that you've been though enough of the original set to have a couple of nodes setup with the Demonstration project).
Thanks,
Anthony Shortland
anthony@controltier.com
Thursday, April 24, 2008
Sunday, April 20, 2008
A sheep in wolf's clothing
My recent post regarding configuring OpenSSH on Windows using Cygwin was written from the perspective of users wanting to exploit ControlTier in a broadly Windows based environment.
In this post, I'm going to document a Unix-centric OpenSSH/Cygwin installation designed to make a Windows server look as much like a Unix system as possible when accessed from the network in order to simplify managing a few Windows based systems in largely Unix based environment.
Cygwin software installation
(By the way, a future version of ControlTier will resolve the script and JDK compatibility issues that result in the customizations in this posting).
Anthony Shortland,
anthony@controltier.com
In this post, I'm going to document a Unix-centric OpenSSH/Cygwin installation designed to make a Windows server look as much like a Unix system as possible when accessed from the network in order to simplify managing a few Windows based systems in largely Unix based environment.
Cygwin software installation
- Create a local or domain Windows administrator account that has a POSIX user name (I use the "build" account for these notes).
- Download and run the Cygwin installer.
- The cleanest way to install Cygwin in the root of its own dedicated partition since it is absolutely necessary that the Cygwin root directory is synonymous with the Windows file system root for that drive so that Java's platform agnostic path management will work equally well with the Unix or Windows versions of key paths. Using a separate partition is desirable in order to separate the application installation (under ControlTier and Cygwin) from the Windows OS installation (typically on drive C:):
$ df -k
Filesystem           1K-blocks      Used Available Use% Mounted on
E:\bin                20964348    213848  20750500   2% /usr/bin
E:\lib                20964348    213848  20750500   2% /usr/lib
E:                    20964348    213848  20750500   2% /
c:                     8377864   7003552   1374312  84% /cygdrive/c
$ cd /
$ ls
Cygwin.bat  RECYCLER                   bin       dev  home  proc  usr
Cygwin.ico  System Volume Information  cygdrive  etc  lib   tmp   var
- If this is not feasible then ignore the warnings and select "C:\" as the installation root directory to create a "hybrid" directory structure:
$ pwd
/
$ ls
AUTOEXEC.BAT            MSDOS.SYS                  WINDOWS   home          tmp
CONFIG.SYS              MSOCache                   bin       lib           usr
Cygwin.bat              NTDETECT.COM               boot.ini  ntldr         var
Cygwin.ico              Program Files              cygdrive  pagefile.sys
Documents and Settings  RECYCLER                   cygwin    proc
IO.SYS                  System Volume Information  etc
- Beyond the base package set make sure you include "openssh" (and hence its dependencies). Of course, there are many many other useful packages that you'll probably like to include for a practical installation of Cygwin (e.g. "rsync", "unzip", "zip", "vim", etc).
- Cygwin includes a script to configure the SSH service, run from a "Cygwin Bash Shell" (Note the value given to the CYGWIN environment variable. Note also my comment to the original posting regarding W2k3 Server complications) :
$ ssh-host-config
Generating /etc/ssh_config file
Privilege separation is set to yes by default since OpenSSH 3.3.
However, this requires a non-privileged account called 'sshd'.
For more info on privilege separation read /usr/share/doc/openssh/README.privsep
.

Should privilege separation be used? (yes/no) yes
Generating /etc/sshd_config file


Warning: The following functions require administrator privileges!

Do you want to install sshd as service?
(Say "no" if it's already installed as service) (yes/no) yes

Which value should the environment variable CYGWIN have when
sshd starts? It's recommended to set at least "ntsec" to be
able to change user context without password.
Default is "ntsec".  CYGWIN=binmode ntsec tty

The service has been installed under LocalSystem account.
To start the service, call `net start sshd' or `cygrunsrv -S sshd'.

Host configuration finished. Have fun!
- Start the SSH service:
$ net start sshd
The CYGWIN sshd service is starting.
The CYGWIN sshd service was started successfully.
- Naturally, you can use the Windows system default Java installation so long as its either Java 1.4 or 1.5. However, it may be preferable to install a version of Java specifically for the use of ControlTier. By convention this is installed into "$CTIER_ROOT/pkgs" (usually "$HOME/ctier/pkgs" of the account used to run ControlTier).
- Note that although Sun distributes its JDK in Windows (graphical) installer format, there's nothing stopping you creating a Zip file of a "reference" installation and using that to setup Java across the network.
- Wherever Java is installed, set up the JAVA_HOME environment variable ahead of the ControlTier installation.
- As of ControlTier 3.1.5 the Unix install script ("install.sh") is not compatible with Cygwin (possibly due to assumptions built into Sun's JDK on Windows).
- For this reason, installing the ControlTier software over the network still follows the Windows pattern.
- Setup the key environment variables with Windows style values:
$ export CTIER_ROOT=~/ctier
$ export JAVA_HOME=~/ctier/pkgs/jdk1.5.0_14 - The key thing is to run the "install.bat" command shell from the Cygwin Bash shell:
$ cmd.exe /C install.bat -client

-check-prereqs:
     [echo] Using compatible Java version: 1.5

-load-props:
     [echo] Using CTIER_ROOT: /home/build/ctier
.
.
.
     [echo]     if [ -f ~/.ctierrc ]; then
     [echo]     . ~/.ctierrc
     [echo]     else
     [echo]     echo ~/.ctierrc not found 1>&2
     [echo]     fi

install-client:
[echo] Install Complete - Next, manually setup the ".ctierrc" file in the Cygwin user's home directory to ensure the correct shell environment is available:
$ pwd
/home/build
$ cat .ctierrc
# this file was generated by ControlTier installer.

export CTIER_ROOT=~/ctier

export ANTDEPO_HOME=~/ctier/pkgs/antdepo-1.3.1
export ANTDEPO_BASE=~/ctier/antdepo

# Server settings
export JOBCENTER_HOME=~/ctier/pkgs/jobcenter-0.7
export CATALINA_HOME=~/ctier/workbench
export CATALINA_BASE=~/ctier/workbench

export JAVA_HOME=~/ctier/pkgs/jdk1.5.0_14

export PATH=$JOBCENTER_HOME/bin:$ANTDEPO_HOME/bin:$CATALINA_HOME/bin:$PATH

if [ -n "$BASH" ] ; then
. $ANTDEPO_HOME/etc/bash_completion.sh ;
if [ -t 0 -a -z "$ANTDEPO_CLI_TERSE" ]
then
ANTDEPO_CLI_TERSE=true
export ANTDEPO_CLI_TERSE
fi
fi
- Finally, override the "depot-setup" and "ad" scripts to invoke their Windows counterparts:
$ cat $ANTDEPO_HOME/bin/depot-setup
#!/bin/sh

exec cmd.exe /C depot-setup.bat "$@"
$ cat $ANTDEPO_HOME/bin/ad
#!/bin/sh

exec cmd.exe /C ad.bat "$@"
(By the way, a future version of ControlTier will resolve the script and JDK compatibility issues that result in the customizations in this posting).
Anthony Shortland,
anthony@controltier.com
Tuesday, April 15, 2008
Example Tomcat deployment screencasts
I've created the following set of screen-casts that take you through the process on installing ControlTier in a multi-node environment and deploying a sample Tomcat based web application using the Elements 2.0 module library.
Sort the list of screen-casts by date and start with the three box installation:
These screen-casts are something of an experiment for me. Let me know what you think of this approach to providing tutorial-style documentation.
Anthony Shortland.
anthony@controltier.com
Sort the list of screen-casts by date and start with the three box installation:
These screen-casts are something of an experiment for me. Let me know what you think of this approach to providing tutorial-style documentation.
Anthony Shortland.
anthony@controltier.com
Monday, April 14, 2008
Integrating ControlTier with Active Directory
I recently posted a pretty comprehensive set of notes on using LDAP based authentication and authorization to control access to the ControlTier server applications (Workbench, WebDAV, and Jobcenter).
It turns out that, more often than not, our clients have a Microsoft Active Directory server to provide enterprise-wide authentication and authorization services. Fortunately, AD is an excellent LDAP compliant directory server, and so it is possible to configure ControlTier to directly us it as follows.
It turns out that, more often than not, our clients have a Microsoft Active Directory server to provide enterprise-wide authentication and authorization services. Fortunately, AD is an excellent LDAP compliant directory server, and so it is possible to configure ControlTier to directly us it as follows.
The key thing to note is that not possible to authenticate the AD using "bind mode" as described on the Tomcat 4.1 JNDI realm documentation. For this reason it is necessary explicitly setup an AD account to serve as the "connectionName" for "comparison mode" authentication. (Note that as a side benefit, this account can be used as the ControlTier client framework account if it is given "admin" role membership - see below).
(By the way, this screencast posted by Alex Tcherniakhovski provides an excellent overview of hooking up Tomcat to Active Directory - you'll need a Microsoft viewer to see it).
Note that these instructions only work with ControlTier 3.1.5 or later.
Active Directory configuration
(By the way, this screencast posted by Alex Tcherniakhovski provides an excellent overview of hooking up Tomcat to Active Directory - you'll need a Microsoft viewer to see it).
Note that these instructions only work with ControlTier 3.1.5 or later.
Active Directory configuration
- Create a simple user account (e.g. "controltier") with a non-expiring password and minimal Domain access rights and delegate "Read all user information" to it using the delegation control wizard of the "Active Directory Users and Computers" management utility.
- Make sure to take a note of the distinguished name ("DN") of the account (e.g. "CN=controltier,OU=Users,OU=MyBusiness,DC=mycompany,DC=com").
- Create "admin" and "manager" groups using the AD management utility to enable Tomcat administration.
- Also add "user" and "architect" groups to complete the minimal set up roles necessary to support the ControlTier server.
- Add user accounts to the various groups to assign authority as required. (Make sure that the simple user account created above is in the "admin" role so that it can serve as the ControlTier framework account).
- Switch the realm configuration in "$CATALINA_BASE/conf/server.xml" to use the JNDIRealm with attributes appropriate for your AD setup (note that the "role" groups have been established under their own organizational unit - OU - called "ControlTierRoles" in this case):
<Realm className="org.apache.catalina.realm.JNDIRealm" debug="4"
   connectionURL="ldap://ad.mycompany.com:389/"
   connectionName="CN=controltier,OU=Users,OU=MyBusiness,DC=mycompany,DC=com"
   connectionPassword="********"
   roleBase="OU=ControlTierRoles,OU=Users,OU=MyBusiness,DC=mycompany,DC=com"
   roleName="CN"
   roleSearch="member={0}"
   userPattern="CN={0},OU=Users,OU=MyBusiness,DC=mycompany,DC=com"/>
- Update "$CATALINA_BASE/webapps/itnav/WEB-INF/classes/auth.properties" to facilitate Workbench role administration:
ngps.workbench.auth.type=jndi
ngps.workbench.auth.jndi.connectionName=CN=controltier,OU=Users,OU=MyBusiness,DC=mycompany,DC=com
ngps.workbench.auth.jndi.connectionPassword=********
ngps.workbench.auth.jndi.connectionUrl=ldap://ad.mycompany.com:389/
ngps.workbench.auth.jndi.roleBase=OU=ControlTierRoles,OU=Users,OU=MyBusiness,DC=mycompany,DC=com
ngps.workbench.auth.jndi.roleNameRDN=CN
ngps.workbench.auth.jndi.roleMemberRDN=member
ngps.workbench.auth.jndi.userBase=OU=Users,OU=MyBusiness,DC=mycompany,DC=com
ngps.workbench.auth.jndi.userNameRDN=CN
- Update "$CATALINA_BASE/webapps/itnav/WEB-INF/classes/runtime.properties" and set the "dav.user" and "dav.password" properties to the credentials of the account setup above.
- Update "$CATALINA_BASE/webapps/webdav/WEB-INF/web.xml" to configure BASIC authentication and general access for "admin" role/group members (per the original posting).
- Update "$JOBCENTER_HOME/bin/start-jobcenter.sh" and switch the "java.security.auth.login.config" Java option to use "jaas-jndi.conf" (per the original posting).
- Update "$JOBCENTER_HOME/webapps/jobcenter/WEB-INF/jaas-jndi.properties" with the AD connection information:
jobcenter.auth.jndi.authType=bind
jobcenter.auth.jndi.connectionName=CN=controltier,OU=Users,OU=MyBusiness,DC=mycompany,DC=com
jobcenter.auth.jndi.connectionPassword=********
jobcenter.auth.jndi.connectionUrl=ldap://ad.mycompany.com:389/
jobcenter.auth.jndi.roleBase=OU=ControlTierRoles,OU=Users,OU=MyBusiness,DC=mycompany,DC=com
jobcenter.auth.jndi.roleNameRDN=CN
jobcenter.auth.jndi.roleMemberRDN=member
jobcenter.auth.jndi.userBase=OU=SBSusers,OU=Users,OU=MyBusiness,DC=mycompany,DC=com
jobcenter.auth.jndi.userNameRDN=CN
- Update "$ANTDEPO_BASE/etc/framework.properties" and set the framework user name and password on every client system:
framework.server.username = controltier
framework.server.password = ********
framework.webdav.username = controltier
framework.webdav.password = ********
Anthony Shortland,
anthony@controltier.com
Thursday, April 10, 2008
Configuring OpenSSH on Windows to support ControlTier
ControlTier's ability to automatically coordinate distributed command execution is built on a Secure Shell (SSH) protocol "network".
QED
Anthony Shortland
anthony@controltier.com
The assumption is that the system user account on a given system used to run a given "dispatchCmd" from ControlTier (usually from the administration node running Jobcenter) has been "equivalenced" to all client users and systems necessary to allow non-interactive authentication via SSH. This is usually achieved using public key authentication.
User setupWhile it is a fair bet that a given Unix/Linux system will be running the SSH server to enable login services, this is almost never the case for Windows systems.
This posting captures the (unfortunately complex and arcane!) steps necessary to deploy an OpenSSH server on a Windows system. The goal is to enable the SSH service, enable a designated Windows user for remote access and facilitate command execution using the command shell (cmd.exe). (These notes do not deliver a full Cygwin installation, just the minimum necessary to enable SSH access).
The notes are an updated version of a posting to the ControlTier Google group.
SSH installation
- Download the latest version of copSSH - this packaging of OpenSSH and Cygwin provides a GUI based installer that simplifies Windows installation.
- Run the copSSH setup program as a user with Administrators group membership.
- Install to "C:\copSSH" or "C:\cygwin" rather than the default location (make sure that there are no spaces in any of the Cygwin paths).
- Create or designate a Windows local (not domain based) system account as the ControlTier user.
- Set a password for the user, and set its home folder to the Cygwin installation hierarchy, e.g.: "C:\copSSH\home\user"
- Log on and off once as the user to ensure settings are established, running a "cmd" shell to confirm that the HOMEDRIVE/HOMEPATH has indeed been set correctly.
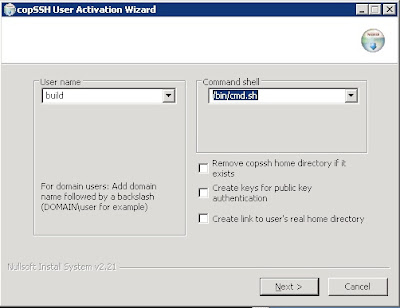
- Run copSSH's "01. Activate a user" item from the start menu.

- Select the "user" and leave the default command shell for the time being.
- Change the user's shell to "/bin/cmd.sh"
- Deselect the options to create public key authentication keys and link the user's real home directory.
- Create the following script in the Cygwin "bin" directory (e.g. "C:\copSSH\bin") using Notepad or similar:
C:\copSSH\bin>type cmd.sh
#!/bin/bash
if [[ $# -eq 0 ]]
then
   exec /cygdrive/c/windows/system32/cmd /Q
else
   shift
   exec /cygdrive/c/windows/system32/cmd /Q /C "$@"
fi
- Convert the script to a Unix style text file as follows:
C:\copSSH\bin>d2u cmd.sh
cmd.sh: done.
- Test the SSH login using a password from a remote system:
$ ssh build@myhost.mydomain
build@myhost.mydomain's password:
Last login: Thu Apr 10 08:11:49 2008 from 10.10.1.30
Microsoft Windows [Version 5.2.3790]
(C) Copyright 1985-2003 Microsoft Corp.

C:\copSSH\home\build>whoami
myhost\build
- Note: Unfortunately, there is no full-screen editor that works directly over the SSH terminal window to the Windows server. Either edit files locally using WordPad (which understands Unix text files) and the "d2u" program as necessary, or scp configuration files off to a remote Unix/Linux system for editing.
- Create a Unix text "authorized_keys" file (no extensions) in the users ".ssh" directory containing the public key of the remote ControlTier user that will administer the box (usually from the ControlTier server).
- Confirm that it is possible to ssh to the account on the system from the equivalenced account on the ControlTier server and authenticate using public key (i.e. without interactively provided a password):
$ ssh build@myhost.mydomain pwd
/home/build
- Note: When ssh'ing into Windows system (e.g. using Putty) be careful about how the backspace character is mapped. The Windows command shell expects "Control-H". Using other characters can cause spurious characters to be embedded in file and directory names, etc.
- By default, the SSH daemon/service does not support setting custom environment. Edit SSH daemon's configuration file (e.g. "C:\copSSH\etc\sshd_config") and set "PermitUserEnvironment yes".
- Create an "environment" file in the user's ".ssh" directory containing the following variables required by the ControlTier client:
C:\copSSH\home\build\.ssh>type environment
JAVA_HOME=C:\Java\jrockit-R27.4.0-jdk1.5.0_12
ANTDEPO_HOME=C:\ctier\pkgs\antdepo-1.3.1
CTIER_ROOT=C:\ctier
ANTDEPO_BASE=C:\ctier\antdepo
- Note: The values of these variables will change with future upgrades and will be specific to your installation choices.
- Use the "Advanced" tab of the "System Properties" control panel to add the Antdepo "bin" directory to the "Path" system environment variable
- Restart the "copSSHD" service to pick up the changes.
- Ssh into the box as the user user and check that the variables are "set" in the command shell.
QED
Anthony Shortland
anthony@controltier.com
Subscribe to:
Posts (Atom)