Monday, December 29, 2008

Abstracted Administration

[The latest version of this post can be found on the ControlTier Wiki]

The idea that drives the ControlTier project is "abstracted administration". In this paradigm, you think about and develop management processes using an abstracted view, one that is independent of any particular physical node or software deployment. What drives the need for abstracted administration is rising scale and complexity . Abstracted administration is paramount in a world where
  • the host environment is varied in kind and size (e.g., different scales in heterogeneous environments and also the growing use of "elastic" virtual machine infrastructure)
  • management processes are becoming more distributed and more easily impacted by application and environmental differences (e.g, multi-step procedures that execute across the network and across different tools).
This project supports the idea of an abstracted administration paradigm, one where you manage distributed application services and their management processes through a simplified, more standardized and abstracted view. Within this paradigm, an administrator has the choice to focus on managing operations from a higher level, and let the underlying framework coordinate operations across the actual physical environment. Of course, one can also choose to manage things at a much finer level of granularity, performing management activity on a particular host, which still remains important.

Note:
* The ControlTier project is not a VM technology. ControlTier is a technology that lets you deploy and control services hosted on operating system instances (virtualized or not).

Abstracted administration framework

Within this paradigm, the framework
  • Lets you manage many deployments through an abstracted, logical structure or at any distinct point by objectifying your process within the context of the abstracted deployment model
  • Wraps around your scripts to produce workflow endpoints that can be combined together to execute distributed multi step processes.
Within the administration framework, your operations processes become more uniform and therefore more reusable, with environment specific parameters and settings externalized in a collaboratively maintained model, shared across support teams. Within this paradigm exists a hierarchy of types that let you break down operation processes into several standard layers, each focused on a specific aspect. Aspects exist for package building, staging and deployment, service run state control, mediated execution, and more.

Abstracted Nodes

For command execution, this project aims to help you abstract the physical Nodes in your environment. Commands ultimately execute on some host, but in large scale environments, it's cumbersome to specify the particular hosts. The ControlTier software provides a couple ways to abstract node infrastructure:

  • Node tags and attributes: The ctl-exec command lets you execute ad hoc commands by addressing target Nodes using tags and attributes rather than lists of hosts. This is a convenient way to manage host groups and ctl-exec supports inclusion and exclusion filters to identify any subset of hosts. ctl-exec also supports parallel execution important when you need to execute actions simultaneously across a large number of hosts.
  • Command dispatching': The ctl command lets you define reusable commands targeted to individual service management control actions or target coordinated distributed actions, logically via a Site. The command dispatcher looks up the nodes on which commands should be executed and invokes them remotely when necessary. In this case, one stays focused on managing service action without having think about nodes.

Abstracting nodes from your procedures is the first step towards abstracted administration. When nodes vary between environments or when they are based on VMs and can be rescaled at any time depending on conditions, your scripts will not have to be changed to redefine node targets.

Abstracting the Service

One of this project's primary goals is to provide a service management interface that lets you forget about Nodes during operation.
  • Long running application components are called Services in ControlTier. You abstract your services by exposing all the physical environment differences in the Service's object model. Doing this lets you define your service management code in an abstracted way. During execution your procedures are bound to environment specific views.
  • ControlTier's Site, provides the management interface that lets you logically control a set of services be they one machine or many. Application components combine together to form a distributed application. Where these components are hosted depends on the environment. For example, in development or QA they may all reside on one node, while in production they may be spread over many.
Exposing logical control of the many parts of a service is a further step towards abstracted administration, since at this level of abstraction not only are Nodes abstracted but so are the individual application deployments that comprise the integrated service.

Abstracting the process

There are several service management life cycle activities common to any application service: build, stage, install, update, stop, start, configure, check, roll back, etc. Of course these activities vary depending on operating system, application platform, or environment. The last aim of the ControlTier project is this: simplify operations by obscuring environment differences that impact procedures.
  • ControlTier includes a standard set of types, each responsible for carrying out each of the life cycle steps. You can also expose your procedures in place of the standard implementation.
  • Service management processes are carried out over multiple steps across different machines. Again depending on where the process runs, process execution can occur on different machines. ControlTier workflows allow you to define and execute processes independent of the environment making them more reusable.
  • Besides abstracting location, service management processes can also be executed sequentially or in parallel without any code modifications. ControlTier workflows allow you to define a thread count in the object model to control parallel or sequential execution.
By exposing life cycle activities as service management workflows reusable across environments, another level of abstracted administration is achieved.

What drives the ideas behind abstracted administration are the successive layering of abstractions:
  • Abstract the nodes, for better visibility into the services.
  • Abstract the services, to gain better visibility of the management processes.
  • Abstract the processes, for standardized reusable life cycle steps and workflows
Through the process of abstraction, all the specifics become maintained in an object model and the procedural code consolidates into common libraries. Less code means less maintenance, better re-usability, and further elimination of procedural variation, often the root cause of service management problems.

Tuesday, December 23, 2008

Focus for 2009

Hello All,

We are winding down 2008, after a good year's development that culminated in the current 3.2 release. The features of 3.2 both evolved and matured the 3.1 functionality, but also include several new fundamental capabilities. We are excited to see new 3.2-based solutions.

Besides working with consultants in the service group, we also work with community members and have acknowledged several areas where focussed effort should be made for the coming year:

Vastly improve our documentation. The docs are currently in a woeful state. They are spread out in a hard to navigate structure and are written too abstractly and are not helpful to new users. Here's how we are going to improve them:
  • Consolidate all the docs into one medium and one site.
  • Use a Wiki instead of Forrest. A Wiki is a much more fluid way to keep docs up to date. Also we can easily add community members to help contribute.
  • Make the documentation "How To" oriented. These are short focussed explanations on using ControlTier software for a typical use case

Merge "Elements" and the ControlTier "base" libraries into a single source code module and build artifact. You may not know this, but Elements is a library of ready to use modules interfacing with J2EE and other application infrastructure. It is currently hosted at Moduleforge. To improve out-0f-the box productivity we'll:
  • Consolidate Elements and Base into a single controltier project "seed" and CTL extension
  • Write documentation that will assume the Elements library is already installed
  • Write tutorials revolving around Elements use cases

Improve release process. I admit it... our release process was very erratic. 2008 releases were all driven by some external project schedule and did not serve the community well. Here's how we'd like to change:
  • Roadmap and milestone based scheduling
  • Regular release points
  • Publicize releases better including mailing list, news, freshmeat, etc
  • Change lists
  • Standard use of Duke's Bank demo for QA testing

ControlTier Demo shall work out of the box. ControlTier software is a pretty general purpose process automation system which sounds great until you want to see it actually do something. In 2008, we began using the J2EE tutorial's sample application, "Duke's Bank" in our demos. This demo shows quite a breadth of ControlTier use cases and helps make its functionality and applicability more concrete. It should work out of the box. Here's what we want to do:
  • Simple demo setup that is well documented and quick to set up
  • Tutorial documentation revolves around the Duke's Bank use cases to establish a consistent set of examples
  • Supporting slide presentation that lets you run your own demos when you want to show other people in your own groups

Increase community involvement and support
  • Take better advantage of the Sourceforge features to allow contributions of all kinds. We barely scratch Sourceforge's surface now and there's some useful tools to take advantage of
  • The community really is the best authority on how to move the project forward so we want to better facilitate comments from the community discussion areas
  • Run a ControlTier IRC. Sometimes a person wants to ask a quick question or just bounce some ideas. 

Of course, development is not frozen for 2009 but we want to shift priorities to make sure the ControlTier project is healthy and the software usable on its own. We are looking forward to driving these improvements and welcome any feedback or helping hands.

Tuesday, December 16, 2008

Installing ControlTier 3.2 on Windows XP

[Note: These instructions are for installing 3.2 and they point to an archived version of the 3.2 manual. If you are installing a newer version of ControlTier go to the ControlTier wiki]

Here's my cheat sheet for installing the ControlTier framework on Windows XP (soon to be folded into the standard documentation!):
  • Use Firefox with the ControlTier web applications since AJAX compatibility issue preclude using IE
  • Follow the 3.2 framework installation notes on Open.ControlTier
  • Choose a %CTIER_ROOT% directory that doesn't contain spaces since this is know to break certain standard modules (e.g. "C:\ctier")
  • So far as dependencies are concerned:
  1. ControlTier requires Java 1.5. I keep a zipped up version of Sun's JDK that I can unpack into "%CTIER_ROOT%\pkgs" to avoid disturbing the system-wide installation. (There are some issues associated with attempting to install multiple versions of Java on the same system using Sun's Microsoft Installer).
  2. You can find the Graphviz Windows installer on their download page (the latest version when I looked was 2.20.3. I also install Graphviz into "%CTIER_ROOT%\pkgs" since it usually only required by ControlTier. (Note that I've found myself having to manually sort out the Path system environment variable in order to ensure the correct "dot.exe" is in %PATH% once Graphviz has been installed a couple of times).
  • Download the Zip release of the latest 3.2 release of the ControlTier framework from Sourceforge. This was version 3.2.4 at the time of writing this posting. (When installing from a local Windows desktop or from an RDP session I prefer to use the Jar installer, for all other circumstances I use the Zip installer).
  • In preparing these notes I ran through the installation (taking default values) using the Zip installation method successfully, however ...
  • ... with this release the Jar installer (which attempts to establish Jetty as a Windows service) is broken.
  • In order to start the ControlTier server:
  1. I started a new command shell and ran the "ctier.bat" script that the installer placed in my user's home directory ("C:\Documents and Settings\Anthony Shortland").
  2. I executed "%JETTY_HOME%\bin\start.bat"
  3. I picked up the ControlTier server's "Welcome" page at "http://localhost:8080" and from there launched Jobcenter, Workbench, ReportCenter and Jackrabbit ...
  4. ... authenticating as "default/default" as required.
  • In order to populate the default Workbench project with a useful set of modules, I downloaded the latest (3.2.4) release of the Elements Module Library seed Jar from the Sourceforge "Moduleforge" project ...
  • ... and loaded it via Workbench's Admin page "import seed" dialog.

At this point I had a working ControlTier framework installation ready to push ahead and try both some of the tutorials on Open.Controltier.

Anthony Shortland.
anthony@controltier.com

Sunday, December 14, 2008

Keeping Workbench trim and fit!

Under the covers the Workbench model data is stored in a set of RDF XML files using the Jena Semantic Web Framework.

At the lowest level, this means that a set of files exists (by default) under "$CTIER_ROOT/workbench/rdfdata" on your ControlTier server for each project you create in Workbench:

$ cd $CTIER_ROOT/workbench/rdfdata
$ ls -lh
total 16M
-rw-rw-r-- 1 anthony anthony 6.1M Dec 8 10:53 Arch_UModules_UPioneerCycling
-rw-rw-r-- 1 anthony anthony 491K Dec 5 17:33 Arch_UObjects_UPioneerCycling
-rw-rw-r-- 1 anthony anthony 6.1M Dec 8 10:53 Arch_UTypes_UPioneerCycling
-rw-rw-r-- 1 anthony anthony 809 Dec 5 14:34 Arch_UXforms_UPioneerCycling
-rw-rw-r-- 1 anthony anthony 490K Dec 8 10:53 Map_UPioneerCycling
-rw-rw-r-- 1 anthony anthony 1022K Dec 8 10:53 Modules_UPioneerCycling
-rw-rw-r-- 1 anthony anthony 56K Dec 5 17:33 Objects_UPioneerCycling
-rw-rw-r-- 1 anthony anthony 1.2M Dec 8 10:53 Types_UPioneerCycling
-rw-rw-r-- 1 anthony anthony 1.4K Dec 5 14:35 Workbench
-rw-rw-r-- 1 anthony anthony 809 Dec 5 14:34 Xforms_UPioneerCycling


A given set of files has the project name appended (in this case "PioneerCycling") and is split into two sets: the primary files and their archives (prefixed with "Arch_").

This would all be largely academic if it were not that managing these files turns out to be critical to the responsive performance of anything but the most trivial projects. It turns out that Jena relies on file level locking to manage updates and in the process repeatedly copies the entire file to temporary "checkpoint" copies. Of course, at the OS level, performance copying files of even tens of MB in size is trivial.

However; streaming the same data through the Jena library turns out to be a significant performance bottleneck; so much so that it really pays to keep the ControlTier repository trim and fit!

The primary way to do this is to navigate to the Workbench administration page, find the "Model Administration (Advanced)" section and run the five file compaction tasks:


This process minimizes the size of the primary data files and can be run as frequently as makes a difference.

Dealing with the archive files is a little more complex.

In normal operation there is no need to track the history of changes to the model so it is reasonable to remove the archive files on a regular basis. The process for achieving this is straightforward:
  1. Shutdown Workbench.
  2. Remove the "Arch_" files from $CTIER_ROOT/workbench/rdfdata associated with the required project(s).
  3. Restart Workbench.
There are a few points to note about this process:
  • It is necessary to do this with Workbench stopped as the file set is cached in the JVM's heap and will simply be re-written otherwise.
  • You may wish to skip the "Modules" archive file since removing it invalidates Workbench's notion of the most recent ("head") version of the packaged modules on the WebDAV requiring that you repackage all Deployment and Package modules - quite a lengthy process.
  • With a project with a stable type model, it is really only "Objects" archive file that has an impact on performance and so it may only necessary to remove this file.
  • As a rule of thumb, only worry about files that are > ~20MB.
  • There have been cases where we've set process up in cron (since Jobcenter/Ctl/Antdepo requires Workbench to be available for normal operation).
Finally, I should note that this whole issue was much more of a problem under ControlTier 3.1 and that we've done a lot to mitigate its impact on performance under ControlTier 3.2 by eliminating unnecessary model versioning. We have not dealt with the fundamental scaling issues in Jena, so it still pays to be conscious of all this.

Anthony Shortland.
anthony@controltier.com

Tuesday, November 11, 2008

Package-centric CTL object data

Background

As larger and larger users begin to use ControlTier outside of non-production environments, issues rising from scale, network policy and change management begin to enter. One feature found in the typical ControlTier infrastructure is the immediate propagation of configuration model changes to affect running deployments. This is great when you want to reset a port setting, change paths, toggle app settings or whatever, and have these changes take immediate effect. Many development environments would come to a grinding halt if they couldn't have this instantaneous centralized control.
Large scale production environments require a different set of assumptions due to infrastructure and policy differences:
* Infrastructure: Production environments can span multiple data centers and subnets making a single data repository impractical. This means a centralized Workbench may not be accessible to all clients or scale sufficiently across 1000s of nodes.
* Policy: Operations managers often are uncomfortable with the idea of application management data being managed outside of a change control. This means ControlTier metadata should be released using the same policies as application code.


This blog post proposes an alternative to managing and releasing ControlTier data using a "build and release" methodology.

Build and Release process

ControlTier object data can be maintained and released using the same build and release lifecycle as any other application artifact.

• Build: Checkout object XML data, load it in Workbench for data validation, then archive the results in a package that can be distributed.
• Release: Retrieve object archive from software release repository, distributing it to CTL hosts then extract the archive.

This process can be driven from the "ProjectBuilder" module included in the base framework. Below is a diagram showing the basic elements:


Tool support

ProjectBuilder support

ProjectBuilder can be enhanced to prepare static metadata files in a "build" phase of the process life cycle. Specifically, ProjectBuilder can generate entity.properties data for a specified set of objects. The result of the generation is a set of files archived in a single file.

archive-objects: A new command

A new command should be added that takes object name and type parameters and generates the entity.properties file for each one. Below is the proposed option set:

usage: archive-objects [-file] [-object <>] [-type <>]

CTL support

CTL will include a new administrative command that can create and extract CTL object data files (eg, entity.properties). Below is the proposed option set:

usage: ctl-archive -a action -file archive [-p project] [-d dir]


Archive delivery

The diagram below describes how the process and tools drive the build and release of CTL object data:


This process diagram left the distribution tool open to user preference. The next diagram shows how RPM and Yum can distribute the data:


Alternatively, a simple ctl-exec script could push and invoke the extraction process:


Next steps: Your feedback
All the basic bits and pieces to support this new package-centric data management methodology exists in 3.2.3. What's left is formalizing it in a documented configuration.
What will be most helpful is feedback on the approach and any other considerations that should be factored in.

If it seems like the approach is on the right track, my next follow up should be the documented "howto".

Thanks, Alex

Wednesday, September 24, 2008

Package management nirvana

Managing the set of package objects and files has been a key challenge for some time now. Obviously, the trick is to keep enough packages around to meet reasonable requirements, but to delete them promptly enough once they are no longer required to avoid consuming too much of the repository's resources.

The "state of the art" since ControlTier 3.0 has been the Builder repoFind command which can (optionally) delete package objects and files (i.e. "purge") following these rules:
  • Identify candidate packages by a type regex
  • Apply a buildstamp/version regex
  • Avoiding deleting any packages that are in use (i.e. have referrer relationships)
(Note that repoFind has a companion command, repoPurge, which it calls directly when the "-purge" option is specified).

I recently improved this state of affairs by adding the Purge workflow and the packagePurgeRegex to the Builder base type in order to add the following rule:
  • Avoid deleting the most recently built package associated with the builder
This is achieved by using the attribute to provide an "inverse" regex of the builder's buildstamp attribute as repoFind's buildstamp option - i.e.:

^(?!^${entity.attribute.buildstamp}$).*$

This works well enough with a simple model that has a single builder creating packages of a distinct type. Trouble arises when - as is the case for standard branch, trunk, release development - there are multiple builders (usually of the same type) creating packages of a given type. Since each builder then has a distinct buildstamp attribute; running the Purge workflow for one builder will erroneously delete the most recent builds of any other builder that also manages the package type. Grrr ... the default inverse regex is too inclusive!

The solution for this is to generate a list of buildstamps to exclude based on all instances of the Builder type in question and use that to constrain the action of repoFind.

I have just revised the Builder type to achieve this by adding the "generateBuildstampExcludes" command to the Builder base type. If the Builder (or Builder sub-type) in question has a "BuilderPackagePurgeRegex" setting resource assigned, the command updates its value with the list of buildstamps to exclude.

The last piece of this particular puzzle, then was to add the new command to the Builder's standard Purge workflow, thus ensuring that "entity.attribute.packagePurgeRegex" is set to the appropriate value prior to the invocation of repoFind.

The Purge command's new usage is:

Purge [-buildertype <${entity.classname}>] [-packagetype <${entity.attribute.packageType}>]

... allowing packages of the selected type (defaulting to the assigned package type of the builder) to be purged excluding buildstamps associated will all instances of the specified builder type (defaulting to the type of the invoking builder).

Typical use cases would be to invoke Purge from an operational builder, or to use a "global" ProjectBuilder (co-deployed with the Workbench package repository) to manage purges for all builder and package types.

I've committed these enhancements to the ControlTier 3.1 support branch (since I implemented them for a particular client); however, I'll get them merged into the 3.2 development branch as soon as possible.

Anthony Shortland,
ControlTier Professional Services.

Monday, June 30, 2008

Build and deployment syzygy!

The combination of Subversion, CruiseControl, Ant & Maven with ControlTier has proven to be a powerful unification in the build & deployment universe!

Subversion's provision for committing sets of files labeled with a unique revision number (per repository) provides build numbering as part of a broader release version scheme.

CruiseControl's ability to format and present build output based on custom (Ant and Maven) builders provides a highly visible means of managing builds in the project context.

Ant & Maven deliver comprehensive build tooling providing the means to create packages from a given source base that can be used both for development and release.

To return to the astronomical metaphor, ControlTier is the fifth planet - the "Jupiter" of build and release tools if you like - in the syzygy that really makes this alignment of tools a powerful combination!

When ControlTier's "Elements 2.0" Java Server Module Library is used with version 3.1 of our framework, or "Elements 3.2" is combined with version 3.2 of the framework (due for general availability by the end of July) to automate the build and release cycle, the full power of the integrated tool-set is revealed:
  1. The Elements "AntBuilder" and "MavenBuilder" modules use Subversion's "Last Changed Revision" numbers as "build" numbers that are combined with optional "major", "minor" and "release" version attributes to support automatic generation of "n.n.n.n" package "buildstamps". Automatic generation of package version numbers that meet site convention is critical to continuous integration based automated builds.
  2. The modules include a command to generate a CruiseControl project definition for inclusion in "config.xml". Management of CruiseControl's configuration and operation is therefore completely automated by ControlTier.
  3. The modules also include "shim" scripts that serve as adapters to allow the standard CruiseControl "maven2" and "ant" builders to indirectly invoke Antdepo/Ctl which, in turn, executes the module's (build) command (note that Antdepo/Ctl can also be directly called using CruiseControl's "exec" builder). This approach preserves CruiseControl's ability to format build output while allowing ControlTier to manage the release numbering scheme and guarantee predictable builds.
  4. Since ControlTier's standard Build workflow (checkout, build, import) is "wedged" between CruiseControl and your Ant/Maven based build, we can both manage keeping the working files up to date ahead of each build as well as automatically finding packages produced by the build and importing them into our repository. The standard build workflow provides a solid bridge from build to deployment.
  5. It is also possible to use ControlTier's standard Update workflow (build, upgrade, deploy) to include automatic deployment to a "smoketest" environment for testing with tools such as Selenium. ControlTier facilitates automation of post-build integration testing as part of the continuous integration process.
Consider the power of combining these build tools with the Elements library support for deploying to a growing set of application technologies such as ActiveMQ, Hsqldb, JavaServiceWrapper, Tomcat, Mysql, Apache HTTP, Mule, WindowsService, JBoss, and OpenLDAP. All supported on Linux/Unix (Solaris) and Windows.

On the commercial side of our business, deploying "out-of-the-box" solutions based on the Elements library has become the standard approach for customers using any of these technologies.

Within a couple of weeks we can establish a new ControlTier based build and deployment infrastructure and migrate existing applications to it giving customers the benefit of Jobcenter for self-service deployment and application management, Reportcenter for visibility into build and deployment activity and the Workbench configuration and process automation modeling tool.

Anthony Shortland
anthony@controltier.com


Monday, June 16, 2008

ControlTier on the road

Starting with BarCampESM back in January, we've been hitting the road showing off our tools and engaging in conversations about IT operations and application deployment. Our travels have included presenting our new CTL framework to a variety of systems management user groups as well as exhibitor gigs at SaaSCon and JavaOne.


Next up... O'Reilly's Velocity 08 (June 23 -24). Velocity is a new conference dedicated to operations and performance for web-based businesses. The speaker lineup and the early attendee list bodes well for plenty of interesting and lively conversations. ControlTier will have a booth in the exhibit hall so if you attend Velocity stop by for a demo of our latest tools or to swap war stories with our hard working engineers. Not registered for Velocity? Use the registration code "vel08js" for 20% off.


Whether it be at conferences, user groups, or other forums... we love meeting other folks in our field. If you have any suggestions, leave a comment or send us an email at automation@controltier.com.

Friday, May 09, 2008

Wrangling the package repo!

Once you're using a builder from day-to-day frequently adding new packages to the ControlTier (WebDAV) repository, it's alarming how quickly their numbers and the amount of disk space they consume can rise!

A couple of new Builder base type commands were introduced with ControlTier 3.1 to facilitate managing the package repository: "repoFind" & "repoPurge".

The "repoFind" command's "-purge" option comes to the rescue by providing the antidote to "repoImport":
repoFind [Builder] [-buildstamp <.*>] [-packagetype <>] [-session ] [-version <.*>] [-purge]
Find package objects in the repository.
Essentially, the command queries the object model matching package objects by "buildstamp" and "packagetype" regex patterns to create a list of candidate packages, the (optionally) calling the "repoPurge" command which invokes each package's "purge" command:
purge -url <>
removes the file from the repository
... which in turn deletes the package file using the Ant "davdelete" task. Finally, the "repoPurge" command executes a batched deletion of all the selected package objects. Note that only package that do not have referrer relationships are deleted (i.e. packages that are not in use).

Here are a couple of examples:
  • Purge all packages regardless of their type associated with a given buildstamp:
    $ ad -p rhbc -t AtgDasModuleBuilder -o babyandchild -c repoFind --
    -buildstamp 8734 -purge

  • Purge all packages of a given type regardless of their buildstamp (the "packagetype" option value can be a regex too):
    $ ad -p rhbc -t AtgDasModuleBuilder -o babyandchild -c repoFind -- -buildstamp '.*'
    -packagetype AtgModuleJar -purge

By the way, having just run through using "repoFind" with one of our client's projects, I can report a subtle bug that I've just fixed in the "repoPurge" command. It turns out that the command assumes that the required Package module is installed in order to be able to run the "purge" commands. This is always the case if you invoke the "repoPurge" command from a node which has previously been used for a "repoImport" (e.g. your build system), but if you choose another system (e.g. the ControlTier server), the module is not available and the command fails.

Here's the fix using the same logic used in "repoImport":
$ svn diff repoPurge.xml
Index: repoPurge.xml
===================================================================
--- repoPurge.xml (revision 8087)
+++ repoPurge.xml (working copy)
@@ -88,6 +88,13 @@
<session-get session="${session.command}" resultproperty="pkg.mapref-uri" key="purge.package.@{pkgType}.@{pkgName}.mapref-uri"/>
<session-get session="${session.command}" resultproperty="pkg.repo-url" key="purge.package.@{pkgType}.@{pkgName}.repo-url"/>
<propertyregex property="filetype" override="true" input="@{pkgName}" regexp="[^\.]*.([^\.]*)$" select="\1"/>
+ <controller>
+ <execute>
+ <context/>
+ <command name="Install-Module" module="Managed-Entity" depot="${context.depot}"/>
+ <arg line="-depot ${context.depot} -module @{pkgType} -version head"/>
+ </execute>
+ </controller>
<controller>
<execute>
<context/>

The fix will make the next 3.1 point release and will be merged into the 3.2 development brach and posted to Sourceforge soon.

Thanks,

Anthony.

Tuesday, May 06, 2008

See you at JavaOne

This year marks the first we go to JavaOne as an exhibitor. It's about time, given our deep experience in automating development and operations for our predominantly Java-using customer base. Our Java Server Library, "Elements", has been evolving over the last couple years, and has really been an instrumental part of improving customer's life cycle reliability and speed.
Java is front and center at ControlTier. Our new CTL control dispatcher has special documentation areas for Ant and Maven users. There's still a lot of functionality useful to Java users that we are in the midst of packaging and documenting.
Of course, all the Open.ControlTier software is Java-based, and as one of ControlTier's developers, it's exciting to be at JavaOne to see what's new.
If you are going to be there, swing by the ControlTier booth and say hello.

Thursday, April 24, 2008

Example JBoss deployment screencasts

My previous post on deploying a sample application to Tomcat proved so popular that I've added this set of screencasts that describe how to do a similar deployment to JBoss. (Note that the screencasts assume that you've been though enough of the original set to have a couple of nodes setup with the Demonstration project).


Thanks,

Anthony Shortland
anthony@controltier.com

Sunday, April 20, 2008

A sheep in wolf's clothing

My recent post regarding configuring OpenSSH on Windows using Cygwin was written from the perspective of users wanting to exploit ControlTier in a broadly Windows based environment.

In this post, I'm going to document a Unix-centric OpenSSH/Cygwin installation designed to make a Windows server look as much like a Unix system as possible when accessed from the network in order to simplify managing a few Windows based systems in largely Unix based environment.

Cygwin software installation
  • Create a local or domain Windows administrator account that has a POSIX user name (I use the "build" account for these notes).
  • Download and run the Cygwin installer.
  • The cleanest way to install Cygwin in the root of its own dedicated partition since it is absolutely necessary that the Cygwin root directory is synonymous with the Windows file system root for that drive so that Java's platform agnostic path management will work equally well with the Unix or Windows versions of key paths. Using a separate partition is desirable in order to separate the application installation (under ControlTier and Cygwin) from the Windows OS installation (typically on drive C:):
    $ df -k
    Filesystem 1K-blocks Used Available Use% Mounted on
    E:\bin 20964348 213848 20750500 2% /usr/bin
    E:\lib 20964348 213848 20750500 2% /usr/lib
    E: 20964348 213848 20750500 2% /
    c: 8377864 7003552 1374312 84% /cygdrive/c
    $ cd /
    $ ls
    Cygwin.bat RECYCLER bin dev home proc usr
    Cygwin.ico System Volume Information cygdrive etc lib tmp var
  • If this is not feasible then ignore the warnings and select "C:\" as the installation root directory to create a "hybrid" directory structure:
    $ pwd
    /
    $ ls
    AUTOEXEC.BAT MSDOS.SYS WINDOWS home tmp
    CONFIG.SYS MSOCache bin lib usr
    Cygwin.bat NTDETECT.COM boot.ini ntldr var
    Cygwin.ico Program Files cygdrive pagefile.sys
    Documents and Settings RECYCLER cygwin proc
    IO.SYS System Volume Information etc
  • Beyond the base package set make sure you include "openssh" (and hence its dependencies). Of course, there are many many other useful packages that you'll probably like to include for a practical installation of Cygwin (e.g. "rsync", "unzip", "zip", "vim", etc).
SSH server configuration
  • Cygwin includes a script to configure the SSH service, run from a "Cygwin Bash Shell" (Note the value given to the CYGWIN environment variable. Note also my comment to the original posting regarding W2k3 Server complications) :
    $ ssh-host-config
    Generating /etc/ssh_config file
    Privilege separation is set to yes by default since OpenSSH 3.3.
    However, this requires a non-privileged account called 'sshd'.
    For more info on privilege separation read /usr/share/doc/openssh/README.privsep
    .

    Should privilege separation be used? (yes/no) yes
    Generating /etc/sshd_config file


    Warning: The following functions require administrator privileges!

    Do you want to install sshd as service?
    (Say "no" if it's already installed as service) (yes/no) yes

    Which value should the environment variable CYGWIN have when
    sshd starts? It's recommended to set at least "ntsec" to be
    able to change user context without password.
    Default is "ntsec". CYGWIN=binmode ntsec tty

    The service has been installed under LocalSystem account.
    To start the service, call `net start sshd' or `cygrunsrv -S sshd'.

    Host configuration finished. Have fun!
  • Start the SSH service:
    $ net start sshd
    The CYGWIN sshd service is starting.
    The CYGWIN sshd service was started successfully.
Java installation
  • Naturally, you can use the Windows system default Java installation so long as its either Java 1.4 or 1.5. However, it may be preferable to install a version of Java specifically for the use of ControlTier. By convention this is installed into "$CTIER_ROOT/pkgs" (usually "$HOME/ctier/pkgs" of the account used to run ControlTier).
  • Note that although Sun distributes its JDK in Windows (graphical) installer format, there's nothing stopping you creating a Zip file of a "reference" installation and using that to setup Java across the network.
  • Wherever Java is installed, set up the JAVA_HOME environment variable ahead of the ControlTier installation.
ControlTier installation
  • As of ControlTier 3.1.5 the Unix install script ("install.sh") is not compatible with Cygwin (possibly due to assumptions built into Sun's JDK on Windows).
  • For this reason, installing the ControlTier software over the network still follows the Windows pattern.
  • Setup the key environment variables with Windows style values:
    $ export CTIER_ROOT=~/ctier
    $ export JAVA_HOME=~/ctier/pkgs/jdk1.5.0_14

  • The key thing is to run the "install.bat" command shell from the Cygwin Bash shell:
    $ cmd.exe /C install.bat -client

    -check-prereqs:
    [echo] Using compatible Java version: 1.5

    -load-props:
    [echo] Using CTIER_ROOT: /home/build/ctier
    .
    .
    .
    [echo] if [ -f ~/.ctierrc ]; then
    [echo] . ~/.ctierrc
    [echo] else
    [echo] echo ~/.ctierrc not found 1>&2
    [echo] fi

    install-client:
    [echo] Install Complete

  • Next, manually setup the ".ctierrc" file in the Cygwin user's home directory to ensure the correct shell environment is available:
    $ pwd
    /home/build
    $ cat .ctierrc
    # this file was generated by ControlTier installer.

    export CTIER_ROOT=~/ctier

    export ANTDEPO_HOME=~/ctier/pkgs/antdepo-1.3.1
    export ANTDEPO_BASE=~/ctier/antdepo

    # Server settings
    export JOBCENTER_HOME=~/ctier/pkgs/jobcenter-0.7
    export CATALINA_HOME=~/ctier/workbench
    export CATALINA_BASE=~/ctier/workbench

    export JAVA_HOME=~/ctier/pkgs/jdk1.5.0_14

    export PATH=$JOBCENTER_HOME/bin:$ANTDEPO_HOME/bin:$CATALINA_HOME/bin:$PATH

    if [ -n "$BASH" ] ; then
    . $ANTDEPO_HOME/etc/bash_completion.sh ;
    if [ -t 0 -a -z "$ANTDEPO_CLI_TERSE" ]
    then
    ANTDEPO_CLI_TERSE=true
    export ANTDEPO_CLI_TERSE
    fi
    fi
  • Finally, override the "depot-setup" and "ad" scripts to invoke their Windows counterparts:
    $ cat $ANTDEPO_HOME/bin/depot-setup
    #!/bin/sh

    exec cmd.exe /C depot-setup.bat "$@"
    $ cat $ANTDEPO_HOME/bin/ad
    #!/bin/sh

    exec cmd.exe /C ad.bat "$@"

With this "sleight of hand" in place, it is possible to manage Windows systems on the network in the same way as their Unix/Linux counterparts taking full advantage of the Cygwin and Java/Ant abstractions of the underlying OS facilities.

(By the way, a future version of ControlTier will resolve the script and JDK compatibility issues that result in the customizations in this posting).

Anthony Shortland,
anthony@controltier.com

Tuesday, April 15, 2008

Example Tomcat deployment screencasts

I've created the following set of screen-casts that take you through the process on installing ControlTier in a multi-node environment and deploying a sample Tomcat based web application using the Elements 2.0 module library.

Sort the list of screen-casts by date and start with the three box installation:


These screen-casts are something of an experiment for me. Let me know what you think of this approach to providing tutorial-style documentation.

Anthony Shortland.
anthony@controltier.com

Monday, April 14, 2008

Integrating ControlTier with Active Directory

I recently posted a pretty comprehensive set of notes on using LDAP based authentication and authorization to control access to the ControlTier server applications (Workbench, WebDAV, and Jobcenter).

It turns out that, more often than not, our clients have a Microsoft Active Directory server to provide enterprise-wide authentication and authorization services. Fortunately, AD is an excellent LDAP compliant directory server, and so it is possible to configure ControlTier to directly us it as follows.

The key thing to note is that not possible to authenticate the AD using "bind mode" as described on the Tomcat 4.1 JNDI realm documentation. For this reason it is necessary explicitly setup an AD account to serve as the "connectionName" for "comparison mode" authentication. (Note that as a side benefit, this account can be used as the ControlTier client framework account if it is given "admin" role membership - see below).

(By the way, this screencast posted by Alex Tcherniakhovski provides an excellent overview of hooking up Tomcat to Active Directory - you'll need a Microsoft viewer to see it).

Note that these instructions only work with ControlTier 3.1.5 or later.

Active Directory configuration
  • Create a simple user account (e.g. "controltier") with a non-expiring password and minimal Domain access rights and delegate "Read all user information" to it using the delegation control wizard of the "Active Directory Users and Computers" management utility.
  • Make sure to take a note of the distinguished name ("DN") of the account (e.g. "CN=controltier,OU=Users,OU=MyBusiness,DC=mycompany,DC=com").
  • Create "admin" and "manager" groups using the AD management utility to enable Tomcat administration.
  • Also add "user" and "architect" groups to complete the minimal set up roles necessary to support the ControlTier server.
  • Add user accounts to the various groups to assign authority as required. (Make sure that the simple user account created above is in the "admin" role so that it can serve as the ControlTier framework account).
Tomcat configuration
  • Switch the realm configuration in "$CATALINA_BASE/conf/server.xml" to use the JNDIRealm with attributes appropriate for your AD setup (note that the "role" groups have been established under their own organizational unit - OU - called "ControlTierRoles" in this case):
    <Realm className="org.apache.catalina.realm.JNDIRealm" debug="4"
    connectionURL="ldap://ad.mycompany.com:389/"
    connectionName="CN=controltier,OU=Users,OU=MyBusiness,DC=mycompany,DC=com"
    connectionPassword="********"
    roleBase="OU=ControlTierRoles,OU=Users,OU=MyBusiness,DC=mycompany,DC=com"
    roleName="CN"
    roleSearch="member={0}"
    userPattern="CN={0},OU=Users,OU=MyBusiness,DC=mycompany,DC=com"/>

Workbench configuration
  • Update "$CATALINA_BASE/webapps/itnav/WEB-INF/classes/auth.properties" to facilitate Workbench role administration:
    ngps.workbench.auth.type=jndi
    ngps.workbench.auth.jndi.connectionName=CN=controltier,OU=Users,OU=MyBusiness,DC=mycompany,DC=com
    ngps.workbench.auth.jndi.connectionPassword=********
    ngps.workbench.auth.jndi.connectionUrl=ldap://ad.mycompany.com:389/
    ngps.workbench.auth.jndi.roleBase=OU=ControlTierRoles,OU=Users,OU=MyBusiness,DC=mycompany,DC=com
    ngps.workbench.auth.jndi.roleNameRDN=CN
    ngps.workbench.auth.jndi.roleMemberRDN=member
    ngps.workbench.auth.jndi.userBase=OU=Users,OU=MyBusiness,DC=mycompany,DC=com
    ngps.workbench.auth.jndi.userNameRDN=CN
  • Update "$CATALINA_BASE/webapps/itnav/WEB-INF/classes/runtime.properties" and set the "dav.user" and "dav.password" properties to the credentials of the account setup above.
WebDAV configuration
  • Update "$CATALINA_BASE/webapps/webdav/WEB-INF/web.xml" to configure BASIC authentication and general access for "admin" role/group members (per the original posting).
Jobcenter configuration
  • Update "$JOBCENTER_HOME/bin/start-jobcenter.sh" and switch the "java.security.auth.login.config" Java option to use "jaas-jndi.conf" (per the original posting).
  • Update "$JOBCENTER_HOME/webapps/jobcenter/WEB-INF/jaas-jndi.properties" with the AD connection information:
    jobcenter.auth.jndi.authType=bind
    jobcenter.auth.jndi.connectionName=CN=controltier,OU=Users,OU=MyBusiness,DC=mycompany,DC=com

    jobcenter.auth.jndi.connectionPassword=********
    jobcenter.auth.jndi.connectionUrl=ldap://ad.mycompany.com:389/
    jobcenter.auth.jndi.roleBase=OU=ControlTierRoles,OU=Users,OU=MyBusiness,DC=mycompany,DC=com
    jobcenter.auth.jndi.roleNameRDN=CN
    jobcenter.auth.jndi.roleMemberRDN=member
    jobcenter.auth.jndi.userBase=OU=SBSusers,OU=Users,OU=MyBusiness,DC=mycompany,DC=com
    jobcenter.auth.jndi.userNameRDN=CN

Antdepo configuration
  • Update "$ANTDEPO_BASE/etc/framework.properties" and set the framework user name and password on every client system:
    framework.server.username = controltier
    framework.server.password = ********
    framework.webdav.username = controltier
    framework.webdav.password = ********

Finally, fire up Workbench and Jobcenter and test connectivity. Try some Antdepo commands to make sure client-side authentication is working too.

Anthony Shortland,
anthony@controltier.com

Thursday, April 10, 2008

Configuring OpenSSH on Windows to support ControlTier

ControlTier's ability to automatically coordinate distributed command execution is built on a Secure Shell (SSH) protocol "network".

The assumption is that the system user account on a given system used to run a given "dispatchCmd" from ControlTier (usually from the administration node running Jobcenter) has been "equivalenced" to all client users and systems necessary to allow non-interactive authentication via SSH. This is usually achieved using public key authentication.

While it is a fair bet that a given Unix/Linux system will be running the SSH server to enable login services, this is almost never the case for Windows systems.

This posting captures the (unfortunately complex and arcane!) steps necessary to deploy an OpenSSH server on a Windows system. The goal is to enable the SSH service, enable a designated Windows user for remote access and facilitate command execution using the command shell (cmd.exe). (These notes do not deliver a full Cygwin installation, just the minimum necessary to enable SSH access).

The notes are an updated version of a posting to the ControlTier Google group.

SSH installation
  • Download the latest version of copSSH - this packaging of OpenSSH and Cygwin provides a GUI based installer that simplifies Windows installation.
  • Run the copSSH setup program as a user with Administrators group membership.
  • Install to "C:\copSSH" or "C:\cygwin" rather than the default location (make sure that there are no spaces in any of the Cygwin paths).
User setup
  • Create or designate a Windows local (not domain based) system account as the ControlTier user.
  • Set a password for the user, and set its home folder to the Cygwin installation hierarchy, e.g.: "C:\copSSH\home\user"
  • Log on and off once as the user to ensure settings are established, running a "cmd" shell to confirm that the HOMEDRIVE/HOMEPATH has indeed been set correctly.
Enable SSH for the user
  • Run copSSH's "01. Activate a user" item from the start menu.
  • Select the "user" and leave the default command shell for the time being.
  • Change the user's shell to "/bin/cmd.sh"
  • Deselect the options to create public key authentication keys and link the user's real home directory.
  • Create the following script in the Cygwin "bin" directory (e.g. "C:\copSSH\bin") using Notepad or similar:
    C:\copSSH\bin>type cmd.sh
    #!/bin/bash
    if [[ $# -eq 0 ]]
    then
    exec /cygdrive/c/windows/system32/cmd /Q
    else
    shift
    exec /cygdrive/c/windows/system32/cmd /Q /C "$@"
    fi
  • Convert the script to a Unix style text file as follows:
    C:\copSSH\bin>d2u cmd.sh
    cmd.sh: done.

  • Test the SSH login using a password from a remote system:
    $ ssh build@myhost.mydomain
    build@myhost.mydomain's password:
    Last login: Thu Apr 10 08:11:49 2008 from 10.10.1.30
    Microsoft Windows [Version 5.2.3790]
    (C) Copyright 1985-2003 Microsoft Corp.

    C:\copSSH\home\build>whoami
    myhost\build

  • Note: Unfortunately, there is no full-screen editor that works directly over the SSH terminal window to the Windows server. Either edit files locally using WordPad (which understands Unix text files) and the "d2u" program as necessary, or scp configuration files off to a remote Unix/Linux system for editing.
  • Create a Unix text "authorized_keys" file (no extensions) in the users ".ssh" directory containing the public key of the remote ControlTier user that will administer the box (usually from the ControlTier server).
  • Confirm that it is possible to ssh to the account on the system from the equivalenced account on the ControlTier server and authenticate using public key (i.e. without interactively provided a password):
    $ ssh build@myhost.mydomain pwd
    /home/build
  • Note: When ssh'ing into Windows system (e.g. using Putty) be careful about how the backspace character is mapped. The Windows command shell expects "Control-H". Using other characters can cause spurious characters to be embedded in file and directory names, etc.
Configure the environment
  • By default, the SSH daemon/service does not support setting custom environment. Edit SSH daemon's configuration file (e.g. "C:\copSSH\etc\sshd_config") and set "PermitUserEnvironment yes".
  • Create an "environment" file in the user's ".ssh" directory containing the following variables required by the ControlTier client:
    C:\copSSH\home\build\.ssh>type environment
    JAVA_HOME=C:\Java\jrockit-R27.4.0-jdk1.5.0_12
    ANTDEPO_HOME=C:\ctier\pkgs\antdepo-1.3.1
    CTIER_ROOT=C:\ctier
    ANTDEPO_BASE=C:\ctier\antdepo

  • Note: The values of these variables will change with future upgrades and will be specific to your installation choices.
  • Use the "Advanced" tab of the "System Properties" control panel to add the Antdepo "bin" directory to the "Path" system environment variable
  • Restart the "copSSHD" service to pick up the changes.
  • Ssh into the box as the user user and check that the variables are "set" in the command shell.
Despite the complexity of these notes you may concede the relief not having to reboot the Windows server to make it all work!

QED

Anthony Shortland
anthony@controltier.com

Monday, March 31, 2008

Configuring LDAP authentication and authorization on the ControlTier server

The Open.ControlTier documentation on configuring LDAP authentication and authorization has not yet been updated for the 3.1 release and so only covers configuring Workbench, and not support for Jobcenter.

As an interim solution to this omission, this blog entry records the steps necessary to achieve a "state-of-the-art" configuration based on OpenLDAP, which is both useful in itself and also a crucial step toward integrating with Microsoft's Active Directory services which are broadly deployed in larger enterprise infrastructures.

Modest design goal

While it is feasible to exploit LDAP authentication and authorization "pervasively" across all nodes upon which the various ControlTier components are installed, what is documented here is the more modest design goal of using LDAP to secure access only to the centralized ControlTier server conventionally deployed to provide a single point of administration in the network.

This is a practical compromise when you consider that more often than not, command execution on remote client systems is tied to one or more system level "application" accounts as opposed to individual user's logins. These accounts are used to construct the network of public key based passwordless secure shell access from the ControlTier server.

Comprehensive authentication and authorization for ControlTier is therefore achieved at two levels:
  1. At the system level, login access to the server and client systems must be restricted to the set of individuals authorized to use the ControlTier and "application" accounts that provide unfettered access to executing build and deployment commands in the distributed infrastructure.
  2. At the project level, access to the Workbench model, and Jobcenter command interface must be filtered by the user and role-based authentication and authorization scheme intrinsic to those applications.
It is in the latter case that this posting covers using LDAP to manage levels of access to ControlTier's web based services.

Deploying an LDAP instance

You can skip this section if you have an LDAP server available on your network that is accessible from the ControlTier server.

Assuming such a service does not already exist, the first step is to setup an LDAP server instance on a system that is accessible to the ControlTier server. There are many LDAP server implementations available, but here's how to setup the most popular Open Source version: OpenLDAP.

The OpenLDAP Quick Start Guide proposes building the officially released software from source. There are a number of binary distributions available on the Internet, of course, and many Unix variant OSes package OpenLDAP with their releases.

In this case, I used a CentOS 4.5 instance.

These instructions assume you wish to configure and deploy a non-superuser based LDAP server instance to support ControlTier:
  • Acquire, or build OpenLDAP from source. In this case, the software is built from source and installed under $CTIER_ROOT/pkgs to facilitate executing as the ControlTier server account (e.g. "ctier"):
    $ cd $CTIER_ROOT/src
    $ tar zxf openldap-2.4.8.tgz
    $ cd openldap-2.4.8
    $ ./configure --prefix=$CTIER_ROOT/pkgs/openldap-2.4.8
    Configuring OpenLDAP 2.4.8-Release ...
    checking build system type... i686-pc-linux-gnu
    checking host system type... i686-pc-linux-gnu
    checking target system type... i686-pc-linux-gnu
    .
    .
    .
    Making servers/slapd/overlays/statover.c
    Add seqmod ...
    Add syncprov ...
    Please run "make depend" to build dependencies
    $ make depend
    .
    .
    .
    $ make
    .
    .
    .
    $ make install
    .
    .
    .
    $ file $CTIER_ROOT/pkgs/openldap-2.4.8/libexec/slapd
    .../slapd: ELF 32-bit LSB executable, Intel 80386, version 1 (SYSV), for GNU/Linux 2.2.5, dynamically linked (uses shared libs), stripped
  • Customize the "slapd.conf" configuration file (in this case using the "controltier.com" domain):
    $ cd $CTIER_ROOT/pkgs/openldap-2.4.8/etc/openldap
    $ diff slapd.conf slapd.conf.orig
    54,55c54,55
    < suffix "dc=controltier,dc=com"
    < rootdn "cn=Manager,dc=controltier,dc=com"
    ---
    > suffix "dc=my-domain,dc=com"
    > rootdn "cn=Manager,dc=my-domain,dc=com"

  • Start the LDAP server on a non-privileged port:
    $ $CTIER_ROOT/pkgs/openldap-2.4.8/libexec/slapd -h ldap://*:3890/
  • Check that the server is up and running:

    $ $CTIER_ROOT/pkgs/openldap-2.4.8/bin/ldapsearch -h localhost -p 3890 -x -b '' -s base '(objectclass=*)' namingContexts
    # extended LDIF
    #
    # LDAPv3
    # base <> with scope baseObject
    # filter: (objectclass=*)
    # requesting: namingContexts
    #

    #
    dn:
    namingContexts: dc=controltier,dc=com

    # search result
    search: 2
    result: 0 Success

    # numResponses: 2
    # numEntries: 1

One thing to note is that the Elements module library contains an OpenLDAP module that can be used to facilitate management of the LDAP instance. Here's sample project object XML to configure a OpenLDAP instance for use with the setup described above:
<project>
<deployment type="OpenLDAP" name="openLDAP" description="Sample Open LDAP service object" installRoot="${env.CTIER_ROOT}/pkgs/openldap-2.4.8" basedir="${env.CTIER_ROOT}/pkgs/openldap-2.4.8" startuprank="1">
<referrers replace="false">
<resource type="Node" name="localhost"/>
</referrers>
</deployment>
</project>

... and sample command output:
$ ad -p TestProject -t OpenLDAP -o openLDAP -c Stop
running command: assertServiceIsDown
Running handler command: stopService
stopService: openLDAP OpenLDAP on localhost stopped.
[command.timer.OpenLDAP.stopService: 0.565 sec]
true. Execution time: 0.565 sec
[command.timer.Service.Stop: 2.998 sec]
command completed successfully. Execution time: 2.998 sec
$ ad -p TestProject -t OpenLDAP -o openLDAP -c Start
running command: assertServiceIsUp
Running handler command: startService
startService: openLDAP OpenLDAP on localhost started.
[command.timer.OpenLDAP.startService: 0.146 sec]
true. Execution time: 0.146 sec
[command.timer.Service.Start: 2.185 sec]
command completed successfully. Execution time: 2.185 sec
$ ad -p TestProject -t OpenLDAP -o openLDAP -c Status
running assertServiceIsUp command
assertServiceIsUp: /proc/4842 found. openLDAP OpenLDAP on localhost is up.
[command.timer.Service.Status: 2.017 sec]
command completed successfully. Execution time: 2.017 sec

Note that this sample configuration is not particularly sophisticated. There are much more flexible (and secure) ways to deploy OpenLDAP documented on their site.

Populating the directory


Workbench's use of LDAP is pretty straightforward. The Open ControlTier site documents the capabilities of three roles that must exist in the directory:

user - readonly access
admin - can create object
architect - can create objects and create types

Note that both administration and architect users should also be assigned the user role since some elements of the UI assume this (e.g. checks for user role membership are embedded in some of the JSPs).

Note also, that only users with assigned both the admin and architect roles can create new projects.

Please ignore the sample LDIF file on Open.ControlTier, and use the following file as a guideline to structuring your directory:

$ cat users.ldif
# Define top-level entry:
dn: dc=controltier,dc=com
objectClass: dcObject
objectClass: organization
o: ControlTier, Inc.
dc: controltier

# Define an entry to contain users:
dn: ou=users,dc=controltier,dc=com
objectClass: organizationalUnit
ou: users

# Define some users:
dn: cn=user1, ou=users,dc=controltier,dc=com
userPassword: password
objectClass: person
sn: A user account with simple user privileges
cn: user1

dn: cn=user2, ou=users,dc=controltier,dc=com
userPassword: password
objectClass: person
sn: A user account with user and administrator privileges
cn: user2

dn: cn=user3, ou=users,dc=controltier,dc=com
userPassword: password
objectClass: person
sn: A user account with user, administrator and architect privileges
cn: user3

dn: cn=default, ou=users,dc=controltier,dc=com
userPassword: default
objectClass: person
sn: The default account for the ControlTier client to use
cn: default

dn: ou=roles, dc=controltier,dc=com
objectClass: organizationalUnit
ou: roles

dn: cn=architect, ou=roles,dc=controltier,dc=com
objectClass: groupOfUniqueNames
uniqueMember: cn=user3,ou=users,dc=controltier,dc=com
cn: architect

dn: cn=admin, ou=roles,dc=controltier,dc=com
objectClass: groupOfUniqueNames
uniqueMember: cn=user2,ou=users,dc=controltier,dc=com
uniqueMember: cn=user3,ou=users,dc=controltier,dc=com
uniqueMember: cn=default,ou=users,dc=controltier,dc=com
cn: admin

dn: cn=user, ou=roles,dc=controltier,dc=com
objectClass: groupOfUniqueNames
uniqueMember: cn=user1,ou=users,dc=controltier,dc=com
uniqueMember: cn=user2,ou=users,dc=controltier,dc=com
uniqueMember: cn=user3,ou=users,dc=controltier,dc=com
cn: user
Here's the command used to load the records into OpenLDAP:
$ ldapadd -x -H ldap://localhost:3890/ -D "cn=Manager,dc=controltier,dc=com" -w secret -f users.ldif
You can see that it is important to use OS access controls to safeguard the contents of this file from unauthorized access.

Note that you can supplement OpenLDAP's command line interface with JXplorer, an Open Source Java LDAP browser/editor client application.

Configuring Workbench to use LDAP

The next piece of the puzzle is to adjust Tomcat's security "Realm" configuration to use the LDAP server. All that's necessary is to replace the default "UserDatabaseRealm" element in "server.xml" with the following "JNDIRealm" setup:
<Realm className="org.apache.catalina.realm.JNDIRealm" debug="99"
connectionURL="ldap://localhost:3890/"
roleBase="ou=roles,dc=controltier,dc=com"
roleName="cn"
roleSearch="uniqueMember={0}"
userPattern="cn={0},ou=users,dc=controltier,dc=com"/>

This configuration specifies the connection URL to the LDAP server, matches the role base and user pattern to the repository structure (you may need to adjust these for your own repository), and uses the "bind method" of authentication described in the Tomcat 4 documentation.

Before restarting Tomcat, a final piece of configuration will make Workbench user management available from the Administration page. Edit the "auth.properties" file to switch from "default" to "jndi" authentication and authorization:
$ cat $CATALINA_BASE/webapps/itnav/WEB-INF/classes/auth.properties
######################################
# auth.properties
# This is the configuration properties file for the User Management feature.
####
# ngps.workbench.auth.type=default
ngps.workbench.auth.type=jndi

######################################
# To enable User Management with JDNI authorization, set the value of ngps.workbench.auth.type to jndi
# then fill in the JNDI configuration below.
######################################
# Configuration for JNDI authorization:
####

ngps.workbench.auth.jndi.connectionName=cn=Manager,dc=controltier,dc=com
ngps.workbench.auth.jndi.connectionPassword=secret
ngps.workbench.auth.jndi.connectionUrl=ldap://localhost:3890/
ngps.workbench.auth.jndi.roleBase=ou=roles,dc=controltier,dc=com
ngps.workbench.auth.jndi.roleNameRDN=cn
ngps.workbench.auth.jndi.roleMemberRDN=uniqueMember
ngps.workbench.auth.jndi.userBase=ou=users,dc=controltier,dc=com
ngps.workbench.auth.jndi.userNameRDN=cn

(Note that with an embedded password this is another file to safeguard with OS access control).

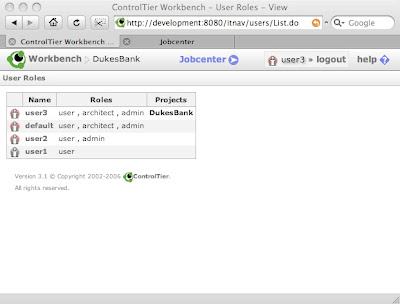
Once JNDI user management is enabled, it is possible to use Workbench user administration to restrict access to individual projects on a user by user basis as well as adjust each user's role assignments:


Configuring WebDAV to use LDAP

Since the ControlTier WebDAV repository is deployed to the same Tomcat instance as Workbench it shares the same authentication realm. Not only is it prudent to protect the WebDAV from general browser based access (e.g. by limiting which users can modify the repository), but, just as importantly, the Antdepo client requires access to the repository to upload packages and download packages and modules.

Tomcat 4.1 includes the Apache Slide WebDAV implementation. Slide security is documented in some detail here. Fine grained access control can be configured both to individual resources and methods. However, from ControlTier's perspective, establishing basic authorization for "admin" role members by adding the following entries to "$CATALINA_BASE/webapps/webdav/WEB-INF/web/xml" and restarting Tomcat is sufficient:
<security-constraint>
<web-resource-collection>
<web-resource-name>Administrative</web-resource-name>
<url-pattern>/*</url-pattern>
</web-resource-collection>
<auth-constraint>
<role-name>admin</role-name>
</auth-constraint>
</security-constraint>

<login-config>
<auth-method>BASIC</auth-method>
<realm-name>JNDIRealm</realm-name>
</login-config>

Note that as of ControlTier 3.1.4, enabling WebDAV authorization and authentication reveals a bug in the Package module's "upload" command's use of the WebDAV "put" Ant task. The workaround is to fall back to the "scp"-based method of uploading packages to the WebDAV.

Configuring Jobcenter to use LDAP

Jobcenter LDAP configuration is modeled on Workbench's JNDI provider and implemented as a standard JAAS LoginModule integrated with Jobcenter's Jetty web application container.

Note: that you must have installed at least ControlTier 3.1.4 to follow these Jobcenter configuration instructions!
  • Modify $JOBCENTER_HOME/bin/start-jobcenter.sh script to specify "jaas-jndi.conf" in place of "jaas.conf" (this specifies the use of the "org.antdepo.webad.jaas.JNDILoginModule" JAAS login module class instead of the standard "org.antdepo.webad.jaas.PropertyFileLoginModule").
  • Modify "$JOBCENTER_HOME/webapps/jobcenter/WEB-INF/jaas-jndi.properties". This file has similar configuration properties to the auth.properties used in
    workbench for JNDI authentication/authorization. The "connectionPassword", and "connectionUrl" should be modified as necessary. Other properties should be left alone unless the structure of the LDAP directory differs from that setup above:
    jobcenter.auth.jndi.connectionName=cn=Manager,dc=controltier,dc=com
    jobcenter.auth.jndi.connectionPassword=secret
    jobcenter.auth.jndi.connectionUrl=ldap://localhost:3890/
    jobcenter.auth.jndi.roleBase=ou=roles,dc=controltier,dc=com
    jobcenter.auth.jndi.roleNameRDN=cn
    jobcenter.auth.jndi.roleMemberRDN=uniqueMember
    jobcenter.auth.jndi.userBase=ou=users,dc=controltier,dc=com
    jobcenter.auth.jndi.userNameRDN=cn

Note that, as of ControlTier 3.1, Jobcenter has no intrinsic mechanism to manage authorization rights for job creation, modification or deletion. This means that anyone who has access to the Jobcenter console can change any job's configuration (even if they don't have the right to execute them). This applies to both scheduled and on-demand jobs. This functional gap will be dealt with in a future enhancement.

Controlling Jobcenter command execution authorization with Antdepo


The right of a user to execute a job from Jobcenter is synonymous with their underlying Antdepo authorization - Jobcenter literally exploits the Antdepo access control mechanism.

Antdepo access control is based on configuring the "$ANTDEPO_BASE/etc/acls.xml" file. The following DTD and default acls.xml show the scope for customizing authorization levels:
$ cat acls.dtd
<!ELEMENT accessto ( command ) >

<!ELEMENT acl ( accessto, by, using, when ) >
<!ATTLIST acl description CDATA #REQUIRED >

<!ELEMENT acls ( acl* ) >

<!ELEMENT by ( role ) >

<!ELEMENT command EMPTY >
<!ATTLIST command module CDATA #REQUIRED >
<!ATTLIST command name CDATA #REQUIRED >

<!ELEMENT context EMPTY >
<!ATTLIST context name CDATA #REQUIRED >
<!ATTLIST context type CDATA #REQUIRED >
<!ATTLIST context depot CDATA #REQUIRED >

<!ELEMENT role EMPTY >
<!ATTLIST role name NMTOKEN #REQUIRED >

<!ELEMENT timeandday EMPTY >
<!ATTLIST timeandday day CDATA #REQUIRED >
<!ATTLIST timeandday hour CDATA #REQUIRED >
<!ATTLIST timeandday minute CDATA #REQUIRED >

<!ELEMENT using ( context ) >

<!ELEMENT when ( timeandday ) >

$ cat acls.xml
<?xml version="1.0" encoding="UTF-8"?>
<!DOCTYPE acls SYSTEM "file:///home/ctier/ctier/antdepo/etc/acls.dtd">

<acls>
<acl description="admin, access to any command using any context at anytime">
<accessto>
<command module="*" name="*"/>
</accessto>
<by>
<role name="admin"/>
</by>
<using>
<context depot="*" type="*" name="*"/>
</using>
<when>
<timeandday day="*" hour="*" minute="*"/>
</when>
</acl>
</acls>

Antdepo client configuration

Finally, every Antdepo client installation both local and remote from the ControlTier server requires access to both Workbench and the WebDAV. The sample LDIF above specifies a user called "default" with the password "default" which has the "admin" role. This is the client framework account specified in "$ANTDEPO_BASE/etc/framework.properties":
framework.server.username = default
framework.server.password = default
framework.webdav.username = default
framework.webdav.password = default
Naturally you are at liberty (and it is probably advisable) to change this account name and password (they are specified at installation time in "defaults.properties). You should the protect the "framework.properties" file using OS authorization mechanisms.

QED

Anthony Shortland
anthony@controltier.com