My previous post on deploying a sample application to Tomcat proved so popular that I've added this set of screencasts that describe how to do a similar deployment to JBoss. (Note that the screencasts assume that you've been though enough of the original set to have a couple of nodes setup with the Demonstration project).
Thanks,
Anthony Shortland
anthony@controltier.com
Showing posts with label HowTo. Show all posts
Showing posts with label HowTo. Show all posts
Thursday, April 24, 2008
Tuesday, April 15, 2008
Example Tomcat deployment screencasts
I've created the following set of screen-casts that take you through the process on installing ControlTier in a multi-node environment and deploying a sample Tomcat based web application using the Elements 2.0 module library.
Sort the list of screen-casts by date and start with the three box installation:
These screen-casts are something of an experiment for me. Let me know what you think of this approach to providing tutorial-style documentation.
Anthony Shortland.
anthony@controltier.com
Sort the list of screen-casts by date and start with the three box installation:
These screen-casts are something of an experiment for me. Let me know what you think of this approach to providing tutorial-style documentation.
Anthony Shortland.
anthony@controltier.com
Thursday, April 10, 2008
Configuring OpenSSH on Windows to support ControlTier
ControlTier's ability to automatically coordinate distributed command execution is built on a Secure Shell (SSH) protocol "network".
QED
Anthony Shortland
anthony@controltier.com
The assumption is that the system user account on a given system used to run a given "dispatchCmd" from ControlTier (usually from the administration node running Jobcenter) has been "equivalenced" to all client users and systems necessary to allow non-interactive authentication via SSH. This is usually achieved using public key authentication.
User setupWhile it is a fair bet that a given Unix/Linux system will be running the SSH server to enable login services, this is almost never the case for Windows systems.
This posting captures the (unfortunately complex and arcane!) steps necessary to deploy an OpenSSH server on a Windows system. The goal is to enable the SSH service, enable a designated Windows user for remote access and facilitate command execution using the command shell (cmd.exe). (These notes do not deliver a full Cygwin installation, just the minimum necessary to enable SSH access).
The notes are an updated version of a posting to the ControlTier Google group.
SSH installation
- Download the latest version of copSSH - this packaging of OpenSSH and Cygwin provides a GUI based installer that simplifies Windows installation.
- Run the copSSH setup program as a user with Administrators group membership.
- Install to "C:\copSSH" or "C:\cygwin" rather than the default location (make sure that there are no spaces in any of the Cygwin paths).
- Create or designate a Windows local (not domain based) system account as the ControlTier user.
- Set a password for the user, and set its home folder to the Cygwin installation hierarchy, e.g.: "C:\copSSH\home\user"
- Log on and off once as the user to ensure settings are established, running a "cmd" shell to confirm that the HOMEDRIVE/HOMEPATH has indeed been set correctly.
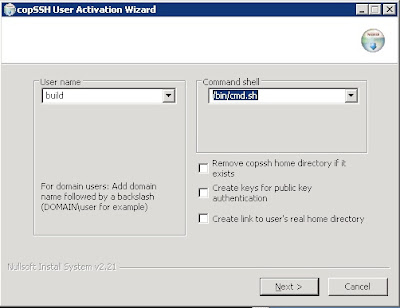
- Run copSSH's "01. Activate a user" item from the start menu.

- Select the "user" and leave the default command shell for the time being.
- Change the user's shell to "/bin/cmd.sh"
- Deselect the options to create public key authentication keys and link the user's real home directory.
- Create the following script in the Cygwin "bin" directory (e.g. "C:\copSSH\bin") using Notepad or similar:
C:\copSSH\bin>type cmd.sh
#!/bin/bash
if [[ $# -eq 0 ]]
then
   exec /cygdrive/c/windows/system32/cmd /Q
else
   shift
   exec /cygdrive/c/windows/system32/cmd /Q /C "$@"
fi
- Convert the script to a Unix style text file as follows:
C:\copSSH\bin>d2u cmd.sh
cmd.sh: done.
- Test the SSH login using a password from a remote system:
$ ssh build@myhost.mydomain
build@myhost.mydomain's password:
Last login: Thu Apr 10 08:11:49 2008 from 10.10.1.30
Microsoft Windows [Version 5.2.3790]
(C) Copyright 1985-2003 Microsoft Corp.

C:\copSSH\home\build>whoami
myhost\build
- Note: Unfortunately, there is no full-screen editor that works directly over the SSH terminal window to the Windows server. Either edit files locally using WordPad (which understands Unix text files) and the "d2u" program as necessary, or scp configuration files off to a remote Unix/Linux system for editing.
- Create a Unix text "authorized_keys" file (no extensions) in the users ".ssh" directory containing the public key of the remote ControlTier user that will administer the box (usually from the ControlTier server).
- Confirm that it is possible to ssh to the account on the system from the equivalenced account on the ControlTier server and authenticate using public key (i.e. without interactively provided a password):
$ ssh build@myhost.mydomain pwd
/home/build
- Note: When ssh'ing into Windows system (e.g. using Putty) be careful about how the backspace character is mapped. The Windows command shell expects "Control-H". Using other characters can cause spurious characters to be embedded in file and directory names, etc.
- By default, the SSH daemon/service does not support setting custom environment. Edit SSH daemon's configuration file (e.g. "C:\copSSH\etc\sshd_config") and set "PermitUserEnvironment yes".
- Create an "environment" file in the user's ".ssh" directory containing the following variables required by the ControlTier client:
C:\copSSH\home\build\.ssh>type environment
JAVA_HOME=C:\Java\jrockit-R27.4.0-jdk1.5.0_12
ANTDEPO_HOME=C:\ctier\pkgs\antdepo-1.3.1
CTIER_ROOT=C:\ctier
ANTDEPO_BASE=C:\ctier\antdepo
- Note: The values of these variables will change with future upgrades and will be specific to your installation choices.
- Use the "Advanced" tab of the "System Properties" control panel to add the Antdepo "bin" directory to the "Path" system environment variable
- Restart the "copSSHD" service to pick up the changes.
- Ssh into the box as the user user and check that the variables are "set" in the command shell.
QED
Anthony Shortland
anthony@controltier.com
Monday, March 31, 2008
Configuring LDAP authentication and authorization on the ControlTier server
The Open.ControlTier documentation on configuring LDAP authentication and authorization has not yet been updated for the 3.1 release and so only covers configuring Workbench, and not support for Jobcenter.
As an interim solution to this omission, this blog entry records the steps necessary to achieve a "state-of-the-art" configuration based on OpenLDAP, which is both useful in itself and also a crucial step toward integrating with Microsoft's Active Directory services which are broadly deployed in larger enterprise infrastructures.
Modest design goal
While it is feasible to exploit LDAP authentication and authorization "pervasively" across all nodes upon which the various ControlTier components are installed, what is documented here is the more modest design goal of using LDAP to secure access only to the centralized ControlTier server conventionally deployed to provide a single point of administration in the network.
This is a practical compromise when you consider that more often than not, command execution on remote client systems is tied to one or more system level "application" accounts as opposed to individual user's logins. These accounts are used to construct the network of public key based passwordless secure shell access from the ControlTier server.
Comprehensive authentication and authorization for ControlTier is therefore achieved at two levels:
Deploying an LDAP instance
You can skip this section if you have an LDAP server available on your network that is accessible from the ControlTier server.
Assuming such a service does not already exist, the first step is to setup an LDAP server instance on a system that is accessible to the ControlTier server. There are many LDAP server implementations available, but here's how to setup the most popular Open Source version: OpenLDAP.
The OpenLDAP Quick Start Guide proposes building the officially released software from source. There are a number of binary distributions available on the Internet, of course, and many Unix variant OSes package OpenLDAP with their releases.
In this case, I used a CentOS 4.5 instance.
These instructions assume you wish to configure and deploy a non-superuser based LDAP server instance to support ControlTier:
Populating the directory
Workbench's use of LDAP is pretty straightforward. The Open ControlTier site documents the capabilities of three roles that must exist in the directory:
user - readonly access
admin - can create object
architect - can create objects and create types
Note that both administration and architect users should also be assigned the user role since some elements of the UI assume this (e.g. checks for user role membership are embedded in some of the JSPs).
Note also, that only users with assigned both the admin and architect roles can create new projects.
Please ignore the sample LDIF file on Open.ControlTier, and use the following file as a guideline to structuring your directory:
Note that you can supplement OpenLDAP's command line interface with JXplorer, an Open Source Java LDAP browser/editor client application.
Configuring Workbench to use LDAP
The next piece of the puzzle is to adjust Tomcat's security "Realm" configuration to use the LDAP server. All that's necessary is to replace the default "UserDatabaseRealm" element in "server.xml" with the following "JNDIRealm" setup:
Before restarting Tomcat, a final piece of configuration will make Workbench user management available from the Administration page. Edit the "auth.properties" file to switch from "default" to "jndi" authentication and authorization:
Once JNDI user management is enabled, it is possible to use Workbench user administration to restrict access to individual projects on a user by user basis as well as adjust each user's role assignments:
Configuring WebDAV to use LDAP
Since the ControlTier WebDAV repository is deployed to the same Tomcat instance as Workbench it shares the same authentication realm. Not only is it prudent to protect the WebDAV from general browser based access (e.g. by limiting which users can modify the repository), but, just as importantly, the Antdepo client requires access to the repository to upload packages and download packages and modules.
Tomcat 4.1 includes the Apache Slide WebDAV implementation. Slide security is documented in some detail here. Fine grained access control can be configured both to individual resources and methods. However, from ControlTier's perspective, establishing basic authorization for "admin" role members by adding the following entries to "$CATALINA_BASE/webapps/webdav/WEB-INF/web/xml" and restarting Tomcat is sufficient:
Configuring Jobcenter to use LDAP
This is a practical compromise when you consider that more often than not, command execution on remote client systems is tied to one or more system level "application" accounts as opposed to individual user's logins. These accounts are used to construct the network of public key based passwordless secure shell access from the ControlTier server.
Comprehensive authentication and authorization for ControlTier is therefore achieved at two levels:
- At the system level, login access to the server and client systems must be restricted to the set of individuals authorized to use the ControlTier and "application" accounts that provide unfettered access to executing build and deployment commands in the distributed infrastructure.
- At the project level, access to the Workbench model, and Jobcenter command interface must be filtered by the user and role-based authentication and authorization scheme intrinsic to those applications.
Deploying an LDAP instance
You can skip this section if you have an LDAP server available on your network that is accessible from the ControlTier server.
Assuming such a service does not already exist, the first step is to setup an LDAP server instance on a system that is accessible to the ControlTier server. There are many LDAP server implementations available, but here's how to setup the most popular Open Source version: OpenLDAP.
The OpenLDAP Quick Start Guide proposes building the officially released software from source. There are a number of binary distributions available on the Internet, of course, and many Unix variant OSes package OpenLDAP with their releases.
In this case, I used a CentOS 4.5 instance.
These instructions assume you wish to configure and deploy a non-superuser based LDAP server instance to support ControlTier:
- Acquire, or build OpenLDAP from source. In this case, the software is built from source and installed under $CTIER_ROOT/pkgs to facilitate executing as the ControlTier server account (e.g. "ctier"):
$ cd $CTIER_ROOT/src
$ tar zxf openldap-2.4.8.tgz
$ cd openldap-2.4.8
$ ./configure --prefix=$CTIER_ROOT/pkgs/openldap-2.4.8
Configuring OpenLDAP 2.4.8-Release ...
checking build system type... i686-pc-linux-gnu
checking host system type... i686-pc-linux-gnu
checking target system type... i686-pc-linux-gnu
.
.
.
Making servers/slapd/overlays/statover.c
Add seqmod ...
Add syncprov ...
Please run "make depend" to build dependencies
$ make depend
.
.
.
$ make
.
.
.
$ make install
.
.
.
$ file $CTIER_ROOT/pkgs/openldap-2.4.8/libexec/slapd
.../slapd: ELF 32-bit LSB executable, Intel 80386, version 1 (SYSV), for GNU/Linux 2.2.5, dynamically linked (uses shared libs), stripped
- Customize the "slapd.conf" configuration file (in this case using the "controltier.com" domain):
$ cd $CTIER_ROOT/pkgs/openldap-2.4.8/etc/openldap
$ diff slapd.conf slapd.conf.orig
54,55c54,55
< suffix                "dc=controltier,dc=com"
< rootdn                "cn=Manager,dc=controltier,dc=com"
---
> suffix                "dc=my-domain,dc=com"
> rootdn                "cn=Manager,dc=my-domain,dc=com"
- Start the LDAP server on a non-privileged port:
$ $CTIER_ROOT/pkgs/openldap-2.4.8/libexec/slapd -h ldap://*:3890/
- Check that the server is up and running:
$ $CTIER_ROOT/pkgs/openldap-2.4.8/bin/ldapsearch -h localhost -p 3890 -x -b '' -s base '(objectclass=*)' namingContexts
# extended LDIF
#
# LDAPv3
# base <> with scope baseObject
# filter: (objectclass=*)
# requesting: namingContexts
#

#
dn:
namingContexts: dc=controltier,dc=com

# search result
search: 2
result: 0 Success

# numResponses: 2
# numEntries: 1
<project>... and sample command output:
<deployment type="OpenLDAP" name="openLDAP" description="Sample Open LDAP service object" installRoot="${env.CTIER_ROOT}/pkgs/openldap-2.4.8" basedir="${env.CTIER_ROOT}/pkgs/openldap-2.4.8" startuprank="1">
<referrers replace="false">
<resource type="Node" name="localhost"/>
</referrers>
</deployment>
</project>
$ ad -p TestProject -t OpenLDAP -o openLDAP -c StopNote that this sample configuration is not particularly sophisticated. There are much more flexible (and secure) ways to deploy OpenLDAP documented on their site.
running command: assertServiceIsDown
Running handler command: stopService
stopService: openLDAP OpenLDAP on localhost stopped.
[command.timer.OpenLDAP.stopService: 0.565 sec]
true. Execution time: 0.565 sec
[command.timer.Service.Stop: 2.998 sec]
command completed successfully. Execution time: 2.998 sec
$ ad -p TestProject -t OpenLDAP -o openLDAP -c Start
running command: assertServiceIsUp
Running handler command: startService
startService: openLDAP OpenLDAP on localhost started.
[command.timer.OpenLDAP.startService: 0.146 sec]
true. Execution time: 0.146 sec
[command.timer.Service.Start: 2.185 sec]
command completed successfully. Execution time: 2.185 sec
$ ad -p TestProject -t OpenLDAP -o openLDAP -c Status
running assertServiceIsUp command
assertServiceIsUp: /proc/4842 found. openLDAP OpenLDAP on localhost is up.
[command.timer.Service.Status: 2.017 sec]
command completed successfully. Execution time: 2.017 sec
Populating the directory
Workbench's use of LDAP is pretty straightforward. The Open ControlTier site documents the capabilities of three roles that must exist in the directory:
user - readonly access
admin - can create object
architect - can create objects and create types
Note that both administration and architect users should also be assigned the user role since some elements of the UI assume this (e.g. checks for user role membership are embedded in some of the JSPs).
Note also, that only users with assigned both the admin and architect roles can create new projects.
Please ignore the sample LDIF file on Open.ControlTier, and use the following file as a guideline to structuring your directory:
Here's the command used to load the records into OpenLDAP:
$ cat users.ldif
# Define top-level entry:
dn: dc=controltier,dc=com
objectClass: dcObject
objectClass: organization
o: ControlTier, Inc.
dc: controltier

# Define an entry to contain users:
dn: ou=users,dc=controltier,dc=com
objectClass: organizationalUnit
ou: users

# Define some users:
dn: cn=user1, ou=users,dc=controltier,dc=com
userPassword: password
objectClass: person
sn: A user account with simple user privileges
cn: user1

dn: cn=user2, ou=users,dc=controltier,dc=com
userPassword: password
objectClass: person
sn: A user account with user and administrator privileges
cn: user2

dn: cn=user3, ou=users,dc=controltier,dc=com
userPassword: password
objectClass: person
sn: A user account with user, administrator and architect privileges
cn: user3

dn: cn=default, ou=users,dc=controltier,dc=com
userPassword: default
objectClass: person
sn: The default account for the ControlTier client to use
cn: default

dn: ou=roles, dc=controltier,dc=com
objectClass: organizationalUnit
ou: roles

dn: cn=architect, ou=roles,dc=controltier,dc=com
objectClass: groupOfUniqueNames
uniqueMember: cn=user3,ou=users,dc=controltier,dc=com
cn: architect

dn: cn=admin, ou=roles,dc=controltier,dc=com
objectClass: groupOfUniqueNames
uniqueMember: cn=user2,ou=users,dc=controltier,dc=com
uniqueMember: cn=user3,ou=users,dc=controltier,dc=com
uniqueMember: cn=default,ou=users,dc=controltier,dc=com
cn: admin

dn: cn=user, ou=roles,dc=controltier,dc=com
objectClass: groupOfUniqueNames
uniqueMember: cn=user1,ou=users,dc=controltier,dc=com
uniqueMember: cn=user2,ou=users,dc=controltier,dc=com
uniqueMember: cn=user3,ou=users,dc=controltier,dc=com
cn: user
$ ldapadd -x -H ldap://localhost:3890/ -D "cn=Manager,dc=controltier,dc=com" -w secret -f users.ldifYou can see that it is important to use OS access controls to safeguard the contents of this file from unauthorized access.
Note that you can supplement OpenLDAP's command line interface with JXplorer, an Open Source Java LDAP browser/editor client application.
Configuring Workbench to use LDAP
The next piece of the puzzle is to adjust Tomcat's security "Realm" configuration to use the LDAP server. All that's necessary is to replace the default "UserDatabaseRealm" element in "server.xml" with the following "JNDIRealm" setup:
<Realm className="org.apache.catalina.realm.JNDIRealm" debug="99"This configuration specifies the connection URL to the LDAP server, matches the role base and user pattern to the repository structure (you may need to adjust these for your own repository), and uses the "bind method" of authentication described in the Tomcat 4 documentation.
connectionURL="ldap://localhost:3890/"
roleBase="ou=roles,dc=controltier,dc=com"
roleName="cn"
roleSearch="uniqueMember={0}"
userPattern="cn={0},ou=users,dc=controltier,dc=com"/>
Before restarting Tomcat, a final piece of configuration will make Workbench user management available from the Administration page. Edit the "auth.properties" file to switch from "default" to "jndi" authentication and authorization:
$ cat $CATALINA_BASE/webapps/itnav/WEB-INF/classes/auth.properties(Note that with an embedded password this is another file to safeguard with OS access control).
######################################
# auth.properties
# This is the configuration properties file for the User Management feature.
####
# ngps.workbench.auth.type=default
ngps.workbench.auth.type=jndi
######################################
# To enable User Management with JDNI authorization, set the value of ngps.workbench.auth.type to jndi
# then fill in the JNDI configuration below.
######################################
# Configuration for JNDI authorization:
####
ngps.workbench.auth.jndi.connectionName=cn=Manager,dc=controltier,dc=com
ngps.workbench.auth.jndi.connectionPassword=secret
ngps.workbench.auth.jndi.connectionUrl=ldap://localhost:3890/
ngps.workbench.auth.jndi.roleBase=ou=roles,dc=controltier,dc=com
ngps.workbench.auth.jndi.roleNameRDN=cn
ngps.workbench.auth.jndi.roleMemberRDN=uniqueMember
ngps.workbench.auth.jndi.userBase=ou=users,dc=controltier,dc=com
ngps.workbench.auth.jndi.userNameRDN=cn
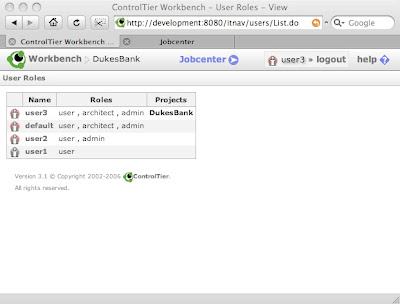
Once JNDI user management is enabled, it is possible to use Workbench user administration to restrict access to individual projects on a user by user basis as well as adjust each user's role assignments:

Configuring WebDAV to use LDAP
Since the ControlTier WebDAV repository is deployed to the same Tomcat instance as Workbench it shares the same authentication realm. Not only is it prudent to protect the WebDAV from general browser based access (e.g. by limiting which users can modify the repository), but, just as importantly, the Antdepo client requires access to the repository to upload packages and download packages and modules.
Tomcat 4.1 includes the Apache Slide WebDAV implementation. Slide security is documented in some detail here. Fine grained access control can be configured both to individual resources and methods. However, from ControlTier's perspective, establishing basic authorization for "admin" role members by adding the following entries to "$CATALINA_BASE/webapps/webdav/WEB-INF/web/xml" and restarting Tomcat is sufficient:
<security-constraint>Note that as of ControlTier 3.1.4, enabling WebDAV authorization and authentication reveals a bug in the Package module's "upload" command's use of the WebDAV "put" Ant task. The workaround is to fall back to the "scp"-based method of uploading packages to the WebDAV.
<web-resource-collection>
<web-resource-name>Administrative</web-resource-name>
<url-pattern>/*</url-pattern>
</web-resource-collection>
<auth-constraint>
<role-name>admin</role-name>
</auth-constraint>
</security-constraint>
<login-config>
<auth-method>BASIC</auth-method>
<realm-name>JNDIRealm</realm-name>
</login-config>
Configuring Jobcenter to use LDAP
Jobcenter LDAP configuration is modeled on Workbench's JNDI provider and implemented as a standard JAAS LoginModule integrated with Jobcenter's Jetty web application container.
Note: that you must have installed at least ControlTier 3.1.4 to follow these Jobcenter configuration instructions!
Note: that you must have installed at least ControlTier 3.1.4 to follow these Jobcenter configuration instructions!
- Modify $JOBCENTER_HOME/bin/start-jobcenter.sh script to specify "jaas-jndi.conf" in place of "jaas.conf" (this specifies the use of the "org.antdepo.webad.jaas.JNDILoginModule" JAAS login module class instead of the standard "org.antdepo.webad.jaas.PropertyFileLoginModule").
- Modify "$JOBCENTER_HOME/webapps/jobcenter/WEB-INF/jaas-jndi.properties". This file has similar configuration properties to the auth.properties used in
workbench for JNDI authentication/authorization. The "connectionPassword", and "connectionUrl" should be modified as necessary. Other properties should be left alone unless the structure of the LDAP directory differs from that setup above:jobcenter.auth.jndi.connectionName=cn=Manager,dc=controltier,dc=com
jobcenter.auth.jndi.connectionPassword=secret
jobcenter.auth.jndi.connectionUrl=ldap://localhost:3890/
jobcenter.auth.jndi.roleBase=ou=roles,dc=controltier,dc=com
jobcenter.auth.jndi.roleNameRDN=cn
jobcenter.auth.jndi.roleMemberRDN=uniqueMember
jobcenter.auth.jndi.userBase=ou=users,dc=controltier,dc=com
jobcenter.auth.jndi.userNameRDN=cn
Note that, as of ControlTier 3.1, Jobcenter has no intrinsic mechanism to manage authorization rights for job creation, modification or deletion. This means that anyone who has access to the Jobcenter console can change any job's configuration (even if they don't have the right to execute them). This applies to both scheduled and on-demand jobs. This functional gap will be dealt with in a future enhancement.
Controlling Jobcenter command execution authorization with Antdepo
The right of a user to execute a job from Jobcenter is synonymous with their underlying Antdepo authorization - Jobcenter literally exploits the Antdepo access control mechanism.
Antdepo access control is based on configuring the "$ANTDEPO_BASE/etc/acls.xml" file. The following DTD and default acls.xml show the scope for customizing authorization levels:
$ cat acls.dtdAntdepo client configuration
<!ELEMENT accessto ( command ) >
<!ELEMENT acl ( accessto, by, using, when ) >
<!ATTLIST acl description CDATA #REQUIRED >
<!ELEMENT acls ( acl* ) >
<!ELEMENT by ( role ) >
<!ELEMENT command EMPTY >
<!ATTLIST command module CDATA #REQUIRED >
<!ATTLIST command name CDATA #REQUIRED >
<!ELEMENT context EMPTY >
<!ATTLIST context name CDATA #REQUIRED >
<!ATTLIST context type CDATA #REQUIRED >
<!ATTLIST context depot CDATA #REQUIRED >
<!ELEMENT role EMPTY >
<!ATTLIST role name NMTOKEN #REQUIRED >
<!ELEMENT timeandday EMPTY >
<!ATTLIST timeandday day CDATA #REQUIRED >
<!ATTLIST timeandday hour CDATA #REQUIRED >
<!ATTLIST timeandday minute CDATA #REQUIRED >
<!ELEMENT using ( context ) >
<!ELEMENT when ( timeandday ) >
$ cat acls.xml
<?xml version="1.0" encoding="UTF-8"?>
<!DOCTYPE acls SYSTEM "file:///home/ctier/ctier/antdepo/etc/acls.dtd">
<acls>
<acl description="admin, access to any command using any context at anytime">
<accessto>
<command module="*" name="*"/>
</accessto>
<by>
<role name="admin"/>
</by>
<using>
<context depot="*" type="*" name="*"/>
</using>
<when>
<timeandday day="*" hour="*" minute="*"/>
</when>
</acl>
</acls>
Finally, every Antdepo client installation both local and remote from the ControlTier server requires access to both Workbench and the WebDAV. The sample LDIF above specifies a user called "default" with the password "default" which has the "admin" role. This is the client framework account specified in "$ANTDEPO_BASE/etc/framework.properties":
framework.server.username = default
framework.server.password = default
framework.webdav.username = default
framework.webdav.password = default
Naturally you are at liberty (and it is probably advisable) to change this account name and password (they are specified at installation time in "defaults.properties). You should the protect the "framework.properties" file using OS authorization mechanisms.
QED
Anthony Shortland
anthony@controltier.com
Subscribe to:
Posts (Atom)